Showing posts with label Card. Show all posts

A Damask Decor Pumpkin Card


This is a card that I have been planning to make for quite some time.  I first spied this awesome pumpkin cut on the Damask Decor cartridge last spring and I just knew I had to use this cut to create a fall themed card.  And what a wait it has been!  There is a basic two layer Damask pumpkin cut and a four layer pumpkin without the Damask flourish on this cartridge.  I decided to merge the two pumpkin cuts for my card.

I used the basic Damask cut for the background - cream cardstock on rusty orange cardstock.  I then cut three of the four individual pumpkin layers and applied them over top of the cream pumpkin cut.


The three layered pumpkin was cut in a solid pumpkin color (bottom layer), a green print layer (middle layer - the stem and leaves show at the top), and a white and orange print (top layer).  I thought the pumpkin still needed something so I used pumpkin color smoochies on the orange cardstock on the bottom layer.  I painted smoochies around the edges and inside the cuts on the front. 

I finished the card with a brown ribbon behind the pumpkin and a second brown ribbon tied to the stem, and a smoochie painted tag.  I cut the tag with George and Basic Shapes.  I then painted it with two colors of smoochies.... pumpkin and bronze.  I used two Close to my Heart stamps, the word cherish and the star, on the tag.  I added white doodles to the tag and the damask layer. 


Thanks for stopping by today.  I will be back tomorrow to share a CLOSE TO MY HEART stamp and Art Philosophy project.  And the blog is going to change focus for the rest of the week and sneak in a few Christmas projects - since it will be here before we know it!!


She Turned Me Into A WHAT????


Happy Monday!  Today I am sharing this week's Bitten by the Bug 2 weekly challenge project.  The Cricut cartridge challenge cut of the week was selected by my design team sister, Carrie from DoubleClick Connections - AKA Abusybee Blog, who chose the cute frog from Cricut's Create a Critter cartridge. 

Given that today is the third day of October and OCTOBER brings constant thoughts of Halloween, I chose to go with a Halloween themed card. My theory is that every witch has a story that involves a frog. Perhaps the frog was a prince or perhaps he was a two legged human toad. Either way, the witch had a plan when she turned him into a frog. In my card, the frog was neither prince nor toad, but a nice man. And he is incredulous that he has been turned into a frog!  And yet, he is smiling because he is trying to make the best of the situation.


The crazy little witch (from Mini Monsters) is doing a happy dance with her arms and legs flying out, so thrilled is she that her frog spell worked.  Since she had planned to stay in and work today, the witch is not wearing her usual black outfit that she wears in public.  She is wearing her witch's "lounge at home" wear, hoping the color is becoming with her green complexion. 


In front of the background moon, I added the Have a Wicked Halloween tag.  I cut the tag using the Close to My Heart Art Philosophy cartridge and stamped the phrase with a stamp from the Close to my Heart September stamp of the month.  For more information on the CTMH Art Philosophy cartridge, click on the name to go to Melanie's CTMH site. 


I used the Paper Doll Dress Up cartridge and cut a cauldron for my witch's use.  I added a bit of white foam to the top of the cauldron.  The pumpkins are from a chipboard sticker set. 


Inside the gate fold card (built with George and Basic Shapes) I added a grey journaling rectangle along with a line of pumpkins and a phrase strip.


I designed this project as a gate fold card with the Halloween scene on the front of the card.  I welded a circle, the witch, cauldron, and the frog shadow images together to create a scene background.  I attached the scene to the right side of the gate fold card. 


Before I close I want to share with you the cute decoration I purchased last Friday.  I found these eyeballs while waiting to have dinner at a Cracker Barrel in Conyers, Georgia.  I was on my way home from returning Ian to Atlanta.  I thought these eyeballs were just too cute.  They are actually salt and pepper shakers, but they were not sold in sets, but individually.  I grabbed a few (at $1.00 each!) and was quite pleased with my purchase!!


I will be back tomorrow to share a Man Card - a fall man card!!  Thanks for stopping by today!

BBTB2 September Blog Hop


Welcome to the September Bitten by the Bug 2 blog hop!   If you are following the blog hop you probably arrived here from the blog of our very talented Penny, PennieAnnies.

If you are a follower who is stopping by my blog, when you finish here be sure to go to the BBTB2 blog and start the hop as you will not want to miss a thing!
 

Our BBTB2 challenge cut of the week was selected by my awesome fellow Michigan State Alumni, Donna of Popsicle Toes.  Donna selected the wheelbarrow cut from Walk in my Garden cartridge.  I do own the WIMG cartridge, but I wanted to be different so I chose to use the wheelbarrow image with the little girl from A Child's Year.


I used three cartridges to create this card:  A Child's Year, Art Philosophy, and Cheerful Seasons.  I designed the card in Cricut Design Studio.  The base card and front matting were cut using Art Philosophy.  I used Cheerful Seasons to cut extra maple leaves to fill my wheelbarrow and to scatter around.


So now on to the blog hop:  Yes, yes, I do have blog candy for the blog hop!  Custom Crops is generously sponsoring my blog for this monthly blog hop, and they will be awarding one blog hopper with a $20 gift voucher to spend at their site!  How cool is that?  All you have to do to be registered for the blog hop is leave a comment under this post and be a follower of this blog. 

If you have not been by Custom Crops in the last few days you are going to be overwhelmed with quantity of new products they have in stock.  There are over 1,000 new products on the Custom Crops web site.  Additionally, there is a special Halloween/Autumn category for all of your fall and Halloween decorating and scrapping. If you love fall as much as I do, you will want to head right over and check out all of the cute autumn crafting products!!!

I am the last stop on the BBTB2 blog hop.  We hope you decided to create your own wheelbarrow project and play along with us this week.  Just post your project at the BBTB2 site to enter.
Thanks for hopping by today - I will be back tomorrow with a new project to share - along with a few photos of a weekend event!

Heritage Tree Halloween Scene with BBTB2


It's another Monday with another Bitten by the Bug 2 challenge and monthly blog hop!!  If you are following the blog hop you arrived here from Penny's blog, PenniAnne's.   Our adorable design team sister, Julie Huxter of Huxter's House, selected this week's challenge cut, Tree 1 from the Heritage cartridge.


When I first looked at the challenge cut, my first thought was “Family Tree”.  I designed a sweet heritage-family tree scrap layout, but I was never hugely excited about the page.  Last Thursday – Saturday I attended Creating Keepsake’s Charlotte Convention in Charlotte, NC and saw some really pretty heritage/family tree cardstock lines, but I did not purchase any.  Friday night while in bed at the Westin, it suddenly came to me.  The card was completely visualized in my head.  I was so afraid that I would forget the card idea before I arrived home!!


I began by cutting the tree, both the icon and shadow cuts at 4.25 inches. Using finger daubers and assorted brown, tan and black ink pads, I added shadows and highlights to the top layer of the tree. I then glued the two layers of trees together and added white pen highlights.

Next, using white card stock, I cut the base card. I welded two 5.5 x 4.25 inch rectangles together and then I welded a 5.5 x 2 inch rectangle to the two rectangles. I scored the card at 4.25 inches (middle fold), at 8.5 inches and at 9.5 inches (to create the fold on the lower front of the card).

Using the same cutting guide as above, I removed one of the two large rectangles and cut a rectangle in the dot cardstock for the front of the card. The dotted cut measured 5.5 x 6.25 inches. I scored at 1 inch and again at 2 inches (to cover the fold at on the bottom front of the card). The dot cardstock was then affixed to the card.

I added pop dots to the back of the tree cuts and added the tree to the card.


Next I cut a 2.75 inch moon in golden orange cardstock.  I inked the edges of the circle with a golden brown ink and added a few black dots.  I affixed the moon to the card with my ATG runner. I then cut a small flying witch from Happy Hauntings and pop dotted her to the front of the moon. 


I cut a 5.5 inch wide iron fence from the Heritage cartridge. Using light blue ink, I added moon light highlights to the fence before affixing it to the front of the card. The bottom of the fence was covered with a Halloween ribbon.

Using punches, I created a triple layer HAPPY HALLOWEEN tag for the lower front edge of the card. Once again I added moon light "highlights" to the tag.


Inside the card I used my new Close to My Heart Halloween stamp set and added the sentiment, Have a Wicked Halloween.  The sentiment is stamped onto green drippy edged cardstock affixed to the same dot cardstock that was used on the front of the card.


I know I mentioned a blog hop….. And you know what that means, right? Blog Candy! I am once again offering FABULOUS blog candy provided by the continuing generosity of CUSTOM CROPS. Custom Crops is offering a $20 gift voucher to my blog candy winner. All you have to do to be registered for the blog candy is be a blog follower of my blog and leave a comment under this post. I will be drawing a winner on Friday.

Custom Crops is one of my favorite on-line scrap goods stores. For me they are a go to source for all things Cricut and paper crafting related. Right now there is a great Back to School sale as well as Sizzix sale at Custom Crops. The Heritage cartridge is one of the Cricut cartridges included in the Back to School sale.

Once you have become a follower and left a comment below, and you have checked out Custom Crops sale, you will be ready to continue on with the blog hop. Your next stop is at the lovely blog of my adorably sweet design team sister, Krista. Krista is sure to inspire you with her Heritage tree project!


Remember that the BBTB2 Design Team loves it when you decide to play along with us on the weekly challenge.  You have two weeks to create your own Tree project and post it under the Heritage Tree post at Bitten by the Bug 2!

Have a great Monday. I will be back tomorrow with details of my seven classes and other CKC experiences!

Fall Digi Stamp BBTB2 Challenge


Hello everyone.  It's another Bitten by the Bug 2 Monday with a stamp and frame challenge.  This week we have a sponsor at BBTB2, The Stamping Boutique, who provided digital stamps for the design team to use in this week's challenge.  We also had to use a frame from the Happy Hauntings cartridge with our digital stamp to complete our project.


We had a choice of several fall or Halloween themed images and I chose this cute scarecrow, who I do not believe could scare a soul!!   I used my Copic markers and colored image to be a night time pumpkin patch setting.  I especially like how my moon and night time sky turned out. 


I chose the loopy square frame from the Happy Hauntings cartridge to use with my card.  Using Cricut Design Studio, I stretched the frame into a rectangle, measuring so that it would fit my image. 

I used Just Because Cards to cut the base card as well as the green background on the card front.  I cut a rectangle to go across the bottom edge of the frame, and a tabbed index card for the top of the card. 


I found fun fall ribbon in my stash and added the ribbon to the index card as well as the top and bottom edges of the card.  I finished the card with an additional loop of ribbon and lots of black and white doodles.
If you have not already done so, please do go by and check out the other design team members' projects for the week.  Some of the projects are truly "WOW"-ers!!  Also, be sure to check BBTB2 this week for information on a new contest that will offer you the opportunity to win some great stamps from


MFK's Anniversary Card


Last week My Friend Kathy - the infamous MFK - celebrated a huge milestone.  She and Mr. MFK celebrated their 40th wedding anniversary!!  For real!  40 years!  MFK and Mr. MFK met while still in high school so in addition to forty years of wedded bliss, they have actually known each other for 45 or so years.  Gotta love a couple who still enjoy one another's company after all of those years.


We, the scrapping girl friends, ignored her actual anniversary - that was for her family and she and Mr. MFK.    We did however, plan a great get together last Saturday night. One of MFK's favorite entertainers is Nick Trivelas Greek Band.  And as luck would have it, Nick was appearing in a nearby city at our favorite Greek restaurant last Saturday night.  So yes, a Greek festival of food, music and dance commenced!!!  While none of us is actually of Greek linage (except of coure the Trivelas'), we all want to be adopted by the Trivelas family.  Greeks know how to have fun.


Now on to the card.  MFK's card was created using ONLY the Art Philosophy cartridge.  I chose a light pink, black and grey color palette because, once upon a time, MFK was married in a light pink dress!!  I cut the scalloped half circle card on the AP cartridge in white cardstock.  I then cut the scalloped half circle topper in pink and gray cardstock, which I printed myself using Theresa Collins Baby Boutique cartridge and my Cricut Imagine.  I inked the edges of the pink and gray half circle before affixing it to the front of the card.


I used some scraps of additional Theresa Collins papers and cut the pennant shapes.  I used the Art Philosophy cartridge to cut the number 40.  The font is adorable and I am plan to use it - A LOT!  I stamped the pennant scroll stamp (from the CTMH Art Philosophy set) onto the pennants and affixed them to the pennant chipboards.  After inking the edges with black ink, I used a blush colored Copic marker to highlight the outside areas of the scroll design.  Finally the word CELEBRATE (again from the CTMH set) was stamped on one pennet and the 40 were added to the other pennant.


Inside the card I used another of the CTMH stamps, the scrolling heart, and added a heart next to the Happy Anniversary (from my stamp stash) sentiment.  I added two of the hearts to the front of the card in charcoal gray ink.  Using the same blush color Copic, I colored the loops in the hearts with the marker.


I wanted MFK to know that I really love her so I added a special touch (HA), and pulled out my trusty Bernina and actually stitched across the top of the card.  I almost never pull out my sewing machine unless I have some mending, so MFK will know to be impressed by this "special" effort.  LOL.  I finished the card with a double ribbon bow, black doodle dots, and a blinged button.

I know the card is rather simple, but my feeling for MFK and Mr. MFK are not so taken lightly.  At our house, we love the MFK family!!

Back to School


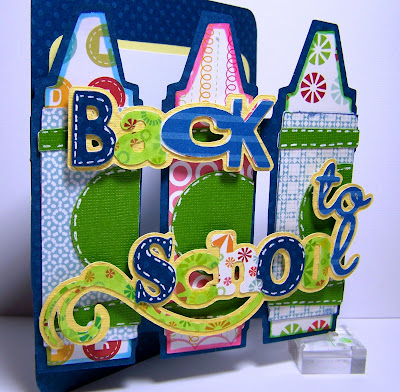
Can you believe that it is already August, that for millions of teachers and students school is just around the corner and soon we will be basking in the luxury of fall temperatures? I confess that after our high today fall temperatures would indeed be a luxury! In honor of the approaching school year my dear design team sister Lori selected this week’s challenge cut. Lori gave us a wide range of choices by selecting any of the school cuts on the Locker Talk cartridge. I do not own Locker Talk, but I found some cute crayons on My Community and this great Back to School phrase on Celebrate with Flourish.


Using Cricut Design Studio and the My Community cartridge, I created a custom card design.  I welded the shadow cut of the three crayons to a square, adding two long thin rectangles across the crayons to hold them together.  As you can see after the words were added the rectangular bars a nearly invisible.

I had fun with my crayon colors, choosing bold prints as my crayons and crayon labels.  I then chose lime green for the contrast color.  


The Back to School phrase was cut in four pieces - the shadow in yellow, the icon cut in a white grounded multi print, a blue stripe and a darker blue solid.  In the end, I thought that the white background multi print was too light, so I colored over most of the white letters with a lime green Copic marker. 


I used pop dots to affix the words to the front of the crayons.  The dimension added by the pop dots allow for the letter to have a bit of a visual pop from the card.


While you are out and about on the Internet today be sure to drop by Bitten by the Bug 2 and check out the design team's fabulous back to school projects! The BBTB2 site will be up at 11 am eastern time. I like to post a bit earlier so as to not miss my early readers.

I will be back with a couple of fun projects to share this week – including a unique birthday card for my future daughter-in-law.

Summer Ice Cream Cones Blog Hop


Happy Monday and welcome to the Bitten by the Bug 2 monthly blog hop! This week we are celebrating summer with fabulous ice cream cones. If you are following the BBTB2 blog hop you arrived here from the amazing Maria’s blog. If you have not been following the blog hop, please consider doing so when you leave my blog.

 
My amazing design team sister, Maria (mentioned above), chose this week’s BBTB2 challenge cut – the ice cream cone from the Sweet Treats cartridge. The cartridge is on sale this week at Custom Crops, who just happens to be sponsoring my blog for this week’s blog hop! I just spent some time browsing the new items at Custom Crops, and I confess I peeked at the Sizzix sale too!


 I ended up working a bit extra on this week’s challenge.  I began by making the large card above while I was at the lake last week.  At the time I was not truly happy with the card so I decided to try again with the smaller card.  However after I arrived home, I attacked the chocolate topping and the phrase “frosty fun” with glossy accents and I realized that I loved the look of the chocolate topping! 


I cut the ice cream and the cone from Bazzill embossed cardstock.  I love the patterns of this cardstock.  I used a brown micro tipped pen and doodled on the embossed patterns – adding a dot to the middle of the flowers on the pink ice cream, and tracing the edges of the pattern on the brown.  I loved this look.


My second card is a three leveled flip open card.  I used the same techniques on the chocolate topping and the ice cream cone.  However, I used different cardstock for the ice cream.  I chose Basic Grey’s strawberry print cardstock for the ice cream layer.  I stamped the phrase “for you” on the edge of the chocolate topping.


The chocolate layer flips up and to reveal the ice cream layer.  You could add another stamp, a charm or a hand written not here.  The ice cream also flips up to reveal a white inner layer, where I stamped the phrase “Happy Birthday.” 


As I mentioned above, Custom Crops is sponsoring my blog hop this week by offering my lucky winner a $20.00 gift voucher.  You can shop the Custom Crops site and apply the voucher code to receive $20 off of your total!  As I also mentioned above, Sweet Treats is currently on sale at Custom Crops - just click this link for a great price on this wonderful cartridge!  Just leave a comment under this post, be a blog follower and you will be entered to win the gift voucher.  I will draw a winner on Thursday.


Thank you for hopping by today.  Your next stop is at PenniAnnies blog, the home of our very sweet Penny!  Penny has the MOST ADOREABLE project to share with you.  Enjoy!

Bridal Shower Card with Graphic45 and Cricut


A few years ago when so many of us began sharing our Cricut Design Studio cut files someone shared a card cut which she called “Anus Lace Edge Card”.  I adore this cut file and will get into more detail momentarily, but first I wanted to apologize – I have no idea who created the original cut file.  At first I thought perhaps it was Jen C., but her cut files usually contain her name.  If you happen to know who created this fabulous cut file PLEASE let me know so that I can thank her again.

Okay, back to today’s card. My friend Beth is preparing for a wedding in her family – her daughter Libby is getting married in a couple of months. I have been invited to a bridal shower for Libby this Saturday and SO unlike me, I have already purchased the gift, done the assigned homework (share a recipe) and now I have created the card!  It is quite unlike me to be this prepared!


I have had this sheet of Graphic45 bridal paper for sometime, but just recently realized that it is PERFECT for a bridal shower card!  With this cardstock in mind, I began looking for the perfect card design to use with this Graphic45 print.  This Anus Lace Card was Perfect base on which to build the Graphic45 card! 

I cut the base card on lightly textured vanilla colored cardstock.  The card front has slits cut for ribbon to run though the card, but I chose to cover that with my base layer of Graphic45.  I cut two rectangular images from the cardstock and using pop dots, I affixed the rectanglular images to the front of the card, building in layers.


I embellished the card with fabulous rose print flower trim.  I trimmed one rose from the strip and glued it to the lower left corner, then I trimmed a three rose section and glued it to the top image layer.  I added gems to the center of the flowers, as well as assorted corners on the Graphic45 cardstock.


The final touchs to the card include the ribbon and knotted "bow" to the middle top layer.  I used an Anna Griffin stamp to create the Best Wishes tag.  A pop dot was placed under the left side of the tag while the right side was pinned to the ribbon.  I just love those tiny pins!!


Here is one last peek at the card - which you click to enlarge.  I hope Libby likes her bridal shower card, I think it is fun and unusual!!!