Showing posts with label BBTB2. Show all posts

Have a Ghostly Halloween


Happy Halloween!  It's not just Halloween, it's a Bitten by the Bug 2 Halloween!  My very talented Design Team sister Shelly (from Shelly's Card Blog) selected the perfect challenge cut for Halloween - a GHOST from the Paper Doll Dress Up cartridge.  And so that we may share the ghoulish fun, this is our monthly blog hop Monday!  I am the first stop on the blog hop and from here you can trick or treat at each of the participating blogs for Blog Candy!


I used several different sized ghosts welded together to create a ghost mesh for my card front.  I welded the four ghosts at the top of the card to a rectangle which is the card back.  I cut a couple of the small ghosts as unwelded individuals so that I could "pop" them on the front of the card.


Using A Child's Year cartridge, I cut three welded trick or treater three times.  I layered the cuts with pop dots and attached them over top of the ghostly mesh.  A rectangle of Halloween orange stamped with stars was glued behind the ghosts.   I finished the card by adding Spooky BOO ribbon to the bottom of the card.


I have wonderful Blog Candy to share - A $20.00 gift voucher from Custom CropsCustom Crops is truly a "go to" on-line merchant for all of your paper crafting needs!  I am especially fond of their selection of Cricut cartridge products; they always have a great selection with great prices.  Today, in honor of Halloween, you can purchase Teresa Collins' Chic and Scary cartridge for $20!!!  Which means if you are my blog candy winner you would only pay shipping for Chic and Scary!!

To register for my blog candy leave a comment below and be follower of my blog.  I will announce the winner on Thursday!

After registering for the Custom Crops gift voucher blog candy you will move on to the next stop on our Halloween blog hop.  You will be visiting the blog of my friend, fellow Michigan State Alumni, design team sister, and a true inspiration - Donna Mundinger of Popsicle Toes!!!  Be prepared - Donna will blow you away!


* * * * * *
Today is the final day to order Close to My Heart's October Stamp of the Month, Holiday Magic. This great stamp set retails for $17.95 and after today it will no longer be available.  If you order $50.00 of merchandise, this stamp set can be your for $5.00!!


If you have not already done so, today would be a great day to order your copy of the Art Philosophy cartridge & stamp set.  For more information on the Art Philosophy set, visit my Close to My Heart store HERE.


I will be back tomorrow with a new project as well as stories of my weekend adventure to share.  Thanks for stopping by today.

Witchy Pillow with Happy Hauntings & BBTB2


Hello everyone, it is another Bitten by the Bug 2 Monday!  I had the pleasure of selecting this week's challenge cut and I chose the FLYING WITCH from the HAPPY HAUNTINGS cartridge!  I love the intensity of this witch's posture - she has "purpose" written all over her.  She must have some Halloween spells to cast or witch's brew to create!


I decided to create home decor project with the witch cut - best of all a reusable project that I can pull out year after year!   I used home decor fabric leftovers from my crafting closet along with Silhouette's FLOCKED HEAT TRANSFER MATERIAL to craft my pillow. 

I placed a 9 x 9 inch square of the flocked heat transfer material onto my cutting mat and cut the witch image at 8 inches.  Following the instructions on the package, using a pressing cloth I ironed the flocked cut onto a square of home decor fabric.   I will add that it took me a few tries to get the hang of how hot the iron had to be and how long the iron had to sit in the same position for the bonding to occur. 


Next I took out my I-Rock tool and assorted color I-Rock gems and bedazzled my witch cut.  I used the hot I-Rock tool edge to outline the cape edges so that gem placement would be easier.  The heated line also defined the areas more clearly.  For those who did not know, I-Rock is great for setting gems onto fabric as well as cardstock/paper. 

Using the leftover home decor fabric from my office window treatments, I was able to sew together this great Halloween home decor pillow.  I photographed the pillow on my bed, simply because it photographed well in that location.  In reality the witch pillow has a spot of honor in an occasional chair in the great room.


Be sure to take time to visit the BBTB2 blog and check out all of the great witchy projects the design team put together!  Also, you may want think about joining the Bitten by the Bug 2 team in this week's challenge and create your own great Witchy project.  If you do not own the Happy Hauntings cartridge, feel free to use a witch from another cartridge in order to join the fun. 


*        *        *        *        *

I will be back later in the week with some fun projects to share.  In the mean time, please remember that I am now a Close to My Heart consultant and would love to help you learn to use the CTMH Art Philosophy cartridge and stamp sets. 


Also please remember that the deadline for ordering your Stamp of the Month, Holiday Magic set is fast approaching.  The stamp set retails for $17.95 but you can order it for $5.00 with any $50 order, but only it is only available until October 31st!!!

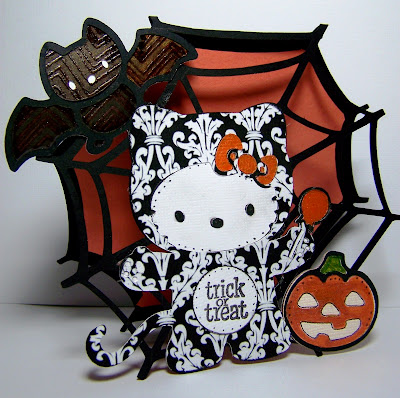
Hello Kitty Trick or Treat Card


Do you know how much I love Hello Kitty?  My Bitten by the Bug 2 design team sister, the lovely Theresa, actually had no idea that Kitty is one of my favorite characters - and character cartridges - when she selected this Halloween outfitted Kitty as our challenge cut of the week.  But how can you not love a trick or treat Hello Kitty?   

I used Cricut Design Studio and two cartridges to create this card:  Hello Kitty Greetings and Happy Hauntings.  All of the character cuts were from HKG, with only the spiderweb card coming from the Happy Hauntings cartridge.   The spiderweb card was created by welding to spiderwebs together.  I used CDS's Hide Select Contour feature (right click the cut, see the bottom item on the list) to hide the inside cuts on one of the spiderwebs.  The "blacked out" spiderweb became the back of the card.


I cut Kitty at just under four inches tall.  Her costume was cut in cardstock printed on the Imagine machine using Teresa Collin's Black & White cartridge!   Kitty was finished with black micro tipped doodles and a "trick or treat" stamp on her tummy.


Also on the front of the card are two other Halloween cuts from the Hello Kitty Greetings cartridge.  I cut the pumpkin at 1.5 inches.  I used Smoochies to highlight the pumpkin cardstock and green Smoochies on the stem area.


The bat was cut at nearly two inches tall.  I used a grey textured striped cardstock for the bat body.  I used copper Smoochies over the grey area to color the bat brown.


I welded the base cuts of each of the three images together and completed the cut in a single piece.  I built the characters on this single cut, then carefully traced the spider lines with glue and glued the Kitty image scene to the spiderweb.    I cut the base cut a second time and glued it to the back side of the spiderweb.

The final additions to the card were orange Smoochies on Kitty's sucker and hairbow.  I also cut the blacked out spiderweb again, one-half inch smaller, in orange cardstock.  I attached the smaller orange cardstock to the inside of the card and stamped a Happy Halloween message in the center.


Thanks for stopping by Busy with the Cricky today.  If you have not already done so, please visit BBTB2 and check out all of the great Kitty designs the design team created this week.  Also, consider playing along with us and entering your own Halloween Hello Kitty project in the weekly challenge.

I will be back tomorrow with an exciting announcement.  I hope you will drop back by.

Halloween Centerpiece a Creepy Vulture


It is Monday and that means it is time for the Bitten by the Bug 2 weekly post.  This week's challenge cut, the Vulture from Cricut's Life's a Party cartridge, was selected by Agnes, my fun design team sister.   I have to admit that I found the vulture to be quite a challenge!  I did not want to do the expected birthday project, so had to put a great deal of thought into this week's project.  I designed a Halloween card that I felt rather indifferent about, but finally Sunday afternoon I had an inspiring thought! 


I remembered that I had this fabulously huge centerpiece vase, with the beads and the candle, that a friend had decorated for my 50th birthday last year.  I took the centerpiece apart, removing black ribbon and flowers, pulling the beads out of the inside, and completely disassembling the birthday vase. 

Using chalkboard vinyl, I cut the vulture from Life's a Party at 3.5 inches tall.  I then cut the graveyard fence from Happy Hauntings at 5.5 inches tall.  I peeled the backing from the vinyl and applied the vinyl to the vase.  Using rusty metallic orange vinyl, I cut the word BOO!, also from the Happy Hauntings cartridge. 


I applied adhesive runner around the top edge of the vase and about one inch from the bottom of the vase. Using black and silver beads, the top of the vase was decorated in a random draping design.  I was pleased that the adhesive held the beads in place.  I trimmed the length of a strand of silver beads and pushed them into the adhesive on the bottom of the vase.   I finished the project by wrapping silver beads around the candle in a criss-cross pattern.

I photographed the centerpiece in two different areas of my house.  I really liked it sitting on the baker's rack (pictured below) but the lighting was not good and I kept getting glare in the photos.  I found the photos above, on the coffee table, showed the details of the cuts far better. 

If you have not already done so, head over to the Bitten by the Bug 2 blog and checkout the design team's great projects.  Also, please consider playing along with us this week and post your project in the Mr. Linky area under this week's post at BBTB2.


Thanks for stopping by today, I will be back with more projects to share this week. 

She Turned Me Into A WHAT????


Happy Monday!  Today I am sharing this week's Bitten by the Bug 2 weekly challenge project.  The Cricut cartridge challenge cut of the week was selected by my design team sister, Carrie from DoubleClick Connections - AKA Abusybee Blog, who chose the cute frog from Cricut's Create a Critter cartridge. 

Given that today is the third day of October and OCTOBER brings constant thoughts of Halloween, I chose to go with a Halloween themed card. My theory is that every witch has a story that involves a frog. Perhaps the frog was a prince or perhaps he was a two legged human toad. Either way, the witch had a plan when she turned him into a frog. In my card, the frog was neither prince nor toad, but a nice man. And he is incredulous that he has been turned into a frog!  And yet, he is smiling because he is trying to make the best of the situation.


The crazy little witch (from Mini Monsters) is doing a happy dance with her arms and legs flying out, so thrilled is she that her frog spell worked.  Since she had planned to stay in and work today, the witch is not wearing her usual black outfit that she wears in public.  She is wearing her witch's "lounge at home" wear, hoping the color is becoming with her green complexion. 


In front of the background moon, I added the Have a Wicked Halloween tag.  I cut the tag using the Close to My Heart Art Philosophy cartridge and stamped the phrase with a stamp from the Close to my Heart September stamp of the month.  For more information on the CTMH Art Philosophy cartridge, click on the name to go to Melanie's CTMH site. 


I used the Paper Doll Dress Up cartridge and cut a cauldron for my witch's use.  I added a bit of white foam to the top of the cauldron.  The pumpkins are from a chipboard sticker set. 


Inside the gate fold card (built with George and Basic Shapes) I added a grey journaling rectangle along with a line of pumpkins and a phrase strip.


I designed this project as a gate fold card with the Halloween scene on the front of the card.  I welded a circle, the witch, cauldron, and the frog shadow images together to create a scene background.  I attached the scene to the right side of the gate fold card. 


Before I close I want to share with you the cute decoration I purchased last Friday.  I found these eyeballs while waiting to have dinner at a Cracker Barrel in Conyers, Georgia.  I was on my way home from returning Ian to Atlanta.  I thought these eyeballs were just too cute.  They are actually salt and pepper shakers, but they were not sold in sets, but individually.  I grabbed a few (at $1.00 each!) and was quite pleased with my purchase!!


I will be back tomorrow to share a Man Card - a fall man card!!  Thanks for stopping by today!

BBTB2 September Blog Hop


Welcome to the September Bitten by the Bug 2 blog hop!   If you are following the blog hop you probably arrived here from the blog of our very talented Penny, PennieAnnies.

If you are a follower who is stopping by my blog, when you finish here be sure to go to the BBTB2 blog and start the hop as you will not want to miss a thing!
 

Our BBTB2 challenge cut of the week was selected by my awesome fellow Michigan State Alumni, Donna of Popsicle Toes.  Donna selected the wheelbarrow cut from Walk in my Garden cartridge.  I do own the WIMG cartridge, but I wanted to be different so I chose to use the wheelbarrow image with the little girl from A Child's Year.


I used three cartridges to create this card:  A Child's Year, Art Philosophy, and Cheerful Seasons.  I designed the card in Cricut Design Studio.  The base card and front matting were cut using Art Philosophy.  I used Cheerful Seasons to cut extra maple leaves to fill my wheelbarrow and to scatter around.


So now on to the blog hop:  Yes, yes, I do have blog candy for the blog hop!  Custom Crops is generously sponsoring my blog for this monthly blog hop, and they will be awarding one blog hopper with a $20 gift voucher to spend at their site!  How cool is that?  All you have to do to be registered for the blog hop is leave a comment under this post and be a follower of this blog. 

If you have not been by Custom Crops in the last few days you are going to be overwhelmed with quantity of new products they have in stock.  There are over 1,000 new products on the Custom Crops web site.  Additionally, there is a special Halloween/Autumn category for all of your fall and Halloween decorating and scrapping. If you love fall as much as I do, you will want to head right over and check out all of the cute autumn crafting products!!!

I am the last stop on the BBTB2 blog hop.  We hope you decided to create your own wheelbarrow project and play along with us this week.  Just post your project at the BBTB2 site to enter.
Thanks for hopping by today - I will be back tomorrow with a new project to share - along with a few photos of a weekend event!

Time For Fun Halloween Set


Happy Monday everyone.  Today's Bitten by the Bug 2 project was selected by our Design Team leader, Heather.  Heather choose the "Time 4 Fun" cut from Cricut's Cutting Up cartridge.  I do not own the Cutting Up cartridge so I chose to create my own welded phrase using Happy Hauntings


I used four cartridges to create this project:  Happy Hauntings, Forever Young, Art Philosophy, and George & Basic Shapes.   Using the Happy Haunting alphabet I welded the characters to create the "Time 4 Fun" phrase that the design team is using this week.  I created a two layer tag using the Art Philosophy card and affixed the two layer word phrase to the tag.  I added black ribbons and tied them with variegated orange twine.

The base box was created using Forever Young.  I placed two identical sheets of 12 x 12 inch cardstock placed side by side on the 12 x 24 inch cutting mat.  After completing the cut I adhered the two halves of the box together with ATG tape.   I had to do this because I did not have any 12 x 24 inch Halloween cardstock.  I scored along the score lines and creased the folds, but left the box open so that I could add the decorative cuts to a flat surface.


Using George and Basic Shapes I welded circles and ovals together to create the orange and silver inlaid matting on the side of the purse.  The edges were inked with black ink before adhesive was added and the mat was affixed the box/purse side. 


 Continuing to use the Happy Haunting cartridge, I cut Dracula at four inches tall and the lady "monster" at 3.6 inches tall.  I created hand cut cocktails for each of the creatures - Dracula is sipping a bag of blood while his date has a deep red cocktail. 


Above and below are close ups of my Halloween dating creatures!


For the purse handle I cut the layered BOO! cut from Happy Hauntings.  I adhered the cut to top of the purse handle.  I also cute several spiderwebs.  I used the same damask print that I used on Dracula's cape and his date's dress to cut the spiderwebs.  I like the effect of the two color print on the spiderwebs.


I forgot to mention that most of designer paper used on this project (and used as a background for the photographs) is the new Halloween line by SEI.


Thanks for stopping by today.  I will be back with a few additional projects this week.  Midweek I will share photos of the two banners I made for Provo Craft's E2 Banner Contest.  In the meantime, if you have not already done so, please go by Bitten by the Bug 2 and check out the other designers' takes on the "Time 4 Fun" cuts.  Also, consider making your own Time 4 Fun project and playing along with us this week. 

3-D Sweet Treat Halloween Fun House


It's another Monday and that means another Bitten by the Bug 2 weekly challenge.  This week's challenge cut was selected by our sweet design team member, Jeri.  Jeri chose for us to use any 3D box for a project of our choice.  I love this fun little house on the Sweet Tooth Boxes cartridge and thought it might look great
dressed up for Halloween.
 

I began by making this elegant black and white cardstock for the house sides. Using my Cricut Imagine and the Teresa Collins Black and White cartridge I printed two sheets of the black and white print above. I then cut the house sides. Next I cut the roof, window, and door trim in solid black cardstock.


I used an interlocking circle embossing folder to emboss the roof piece. The roof tag was cut using the Happy Hauntings cartridge with gray and white cardstock. Black Stickles were used to fill in the word Spooky. As a final touch I added ecru lace to the edge of the roof.


Using Happy Hauntings, I cut a Mr. Bones and affixed him to the corner of the roof. Mr. Bones is sporting black pearl eyes and a few white gel pen doodles.


Using the Paper Doll Dress Up cartridge, I cut a few white spider webs. I snipped one of the webs into quarters and used it on the house windows and roof line. I also added spider webs to the front door and end windows.


Finally I dressed up the tag and windows with black pearls and diamond bling.

Please do go by the Bitten by the Bug 2 blog and check out the design team projects - so many cute 3D boxes!  Also, please think about playing along with us and possibly becoming our weekly blog blinkie winner.  Just create your own 3D box project and post it in the linky spot at the BBTB2 blog!  We love it when our readers play along!!