Showing posts with label C-Paper Doll Dress Up. Show all posts

Have a Ghostly Halloween


Happy Halloween!  It's not just Halloween, it's a Bitten by the Bug 2 Halloween!  My very talented Design Team sister Shelly (from Shelly's Card Blog) selected the perfect challenge cut for Halloween - a GHOST from the Paper Doll Dress Up cartridge.  And so that we may share the ghoulish fun, this is our monthly blog hop Monday!  I am the first stop on the blog hop and from here you can trick or treat at each of the participating blogs for Blog Candy!


I used several different sized ghosts welded together to create a ghost mesh for my card front.  I welded the four ghosts at the top of the card to a rectangle which is the card back.  I cut a couple of the small ghosts as unwelded individuals so that I could "pop" them on the front of the card.


Using A Child's Year cartridge, I cut three welded trick or treater three times.  I layered the cuts with pop dots and attached them over top of the ghostly mesh.  A rectangle of Halloween orange stamped with stars was glued behind the ghosts.   I finished the card by adding Spooky BOO ribbon to the bottom of the card.


I have wonderful Blog Candy to share - A $20.00 gift voucher from Custom CropsCustom Crops is truly a "go to" on-line merchant for all of your paper crafting needs!  I am especially fond of their selection of Cricut cartridge products; they always have a great selection with great prices.  Today, in honor of Halloween, you can purchase Teresa Collins' Chic and Scary cartridge for $20!!!  Which means if you are my blog candy winner you would only pay shipping for Chic and Scary!!

To register for my blog candy leave a comment below and be follower of my blog.  I will announce the winner on Thursday!

After registering for the Custom Crops gift voucher blog candy you will move on to the next stop on our Halloween blog hop.  You will be visiting the blog of my friend, fellow Michigan State Alumni, design team sister, and a true inspiration - Donna Mundinger of Popsicle Toes!!!  Be prepared - Donna will blow you away!


* * * * * *
Today is the final day to order Close to My Heart's October Stamp of the Month, Holiday Magic. This great stamp set retails for $17.95 and after today it will no longer be available.  If you order $50.00 of merchandise, this stamp set can be your for $5.00!!


If you have not already done so, today would be a great day to order your copy of the Art Philosophy cartridge & stamp set.  For more information on the Art Philosophy set, visit my Close to My Heart store HERE.


I will be back tomorrow with a new project as well as stories of my weekend adventure to share.  Thanks for stopping by today.

She Turned Me Into A WHAT????


Happy Monday!  Today I am sharing this week's Bitten by the Bug 2 weekly challenge project.  The Cricut cartridge challenge cut of the week was selected by my design team sister, Carrie from DoubleClick Connections - AKA Abusybee Blog, who chose the cute frog from Cricut's Create a Critter cartridge. 

Given that today is the third day of October and OCTOBER brings constant thoughts of Halloween, I chose to go with a Halloween themed card. My theory is that every witch has a story that involves a frog. Perhaps the frog was a prince or perhaps he was a two legged human toad. Either way, the witch had a plan when she turned him into a frog. In my card, the frog was neither prince nor toad, but a nice man. And he is incredulous that he has been turned into a frog!  And yet, he is smiling because he is trying to make the best of the situation.


The crazy little witch (from Mini Monsters) is doing a happy dance with her arms and legs flying out, so thrilled is she that her frog spell worked.  Since she had planned to stay in and work today, the witch is not wearing her usual black outfit that she wears in public.  She is wearing her witch's "lounge at home" wear, hoping the color is becoming with her green complexion. 


In front of the background moon, I added the Have a Wicked Halloween tag.  I cut the tag using the Close to My Heart Art Philosophy cartridge and stamped the phrase with a stamp from the Close to my Heart September stamp of the month.  For more information on the CTMH Art Philosophy cartridge, click on the name to go to Melanie's CTMH site. 


I used the Paper Doll Dress Up cartridge and cut a cauldron for my witch's use.  I added a bit of white foam to the top of the cauldron.  The pumpkins are from a chipboard sticker set. 


Inside the gate fold card (built with George and Basic Shapes) I added a grey journaling rectangle along with a line of pumpkins and a phrase strip.


I designed this project as a gate fold card with the Halloween scene on the front of the card.  I welded a circle, the witch, cauldron, and the frog shadow images together to create a scene background.  I attached the scene to the right side of the gate fold card. 


Before I close I want to share with you the cute decoration I purchased last Friday.  I found these eyeballs while waiting to have dinner at a Cracker Barrel in Conyers, Georgia.  I was on my way home from returning Ian to Atlanta.  I thought these eyeballs were just too cute.  They are actually salt and pepper shakers, but they were not sold in sets, but individually.  I grabbed a few (at $1.00 each!) and was quite pleased with my purchase!!


I will be back tomorrow to share a Man Card - a fall man card!!  Thanks for stopping by today!

3-D Sweet Treat Halloween Fun House


It's another Monday and that means another Bitten by the Bug 2 weekly challenge.  This week's challenge cut was selected by our sweet design team member, Jeri.  Jeri chose for us to use any 3D box for a project of our choice.  I love this fun little house on the Sweet Tooth Boxes cartridge and thought it might look great
dressed up for Halloween.
 

I began by making this elegant black and white cardstock for the house sides. Using my Cricut Imagine and the Teresa Collins Black and White cartridge I printed two sheets of the black and white print above. I then cut the house sides. Next I cut the roof, window, and door trim in solid black cardstock.


I used an interlocking circle embossing folder to emboss the roof piece. The roof tag was cut using the Happy Hauntings cartridge with gray and white cardstock. Black Stickles were used to fill in the word Spooky. As a final touch I added ecru lace to the edge of the roof.


Using Happy Hauntings, I cut a Mr. Bones and affixed him to the corner of the roof. Mr. Bones is sporting black pearl eyes and a few white gel pen doodles.


Using the Paper Doll Dress Up cartridge, I cut a few white spider webs. I snipped one of the webs into quarters and used it on the house windows and roof line. I also added spider webs to the front door and end windows.


Finally I dressed up the tag and windows with black pearls and diamond bling.

Please do go by the Bitten by the Bug 2 blog and check out the design team projects - so many cute 3D boxes!  Also, please think about playing along with us and possibly becoming our weekly blog blinkie winner.  Just create your own 3D box project and post it in the linky spot at the BBTB2 blog!  We love it when our readers play along!!

Celebrating with Woody and Bullseye


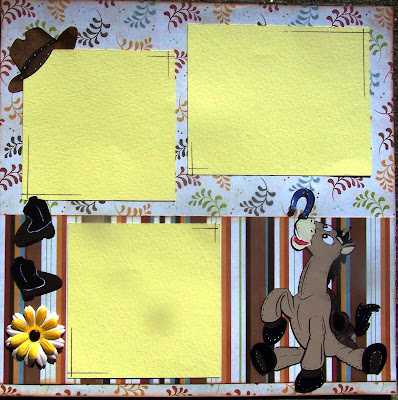
Sheriff Woody is having a "rip-roaring howdy" kind-of day as he and his trusty horse, Bullseye adorn this cute layout for my adorable nephew, Carter.  Carter will be three in a little over two weeks and his Aunt Susan is working away on his scrapbook.  Carter adores Toy Story so of course I must include a few TS related layouts!


I am worried that Carter will notice that Aunt Susan dressed Woody in the wrong colors.  I did not look at a photo of Woody, but instead just selected papers that I liked.  I am hoping that IF Carter notices, someone will tell him that his is Woody's OTHER outfit!  Or perhaps they could say Woody's regular clothes are in the wash???  :-)  Maybe Woody had to change clothes because "there's a snake in [his] boot."


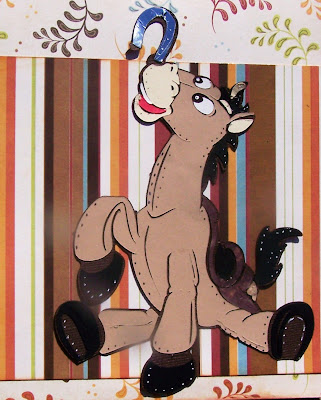
Not to be out done by Woody, Bullseye is looking pretty cute too.  And again, I did not look at Bullseye's photo - let's hope that I got him somewhat correct.  I am betting that the hooves are the right color!!!  I added dots to represent the stitching which holds Bullseye together.


In addition to the Toy Story cuts, I also used the cowboy hat and boots from Paper Doll Dress Up.  I also used George and Basic Shapes to cut the photo mats.  I added silk flowers over the cricut cut flowers on the rope and on the right hand page.  

The cardstock that I used is actually from a fall themed line, but I thought the colors worked wonderfully with the western theme. The colors are so warm looking - and they match the colors I used on Woody and Bullseye.


I hope you enjoyed this layout - and forgive the smudge on my camera lens (the blur in every photo is a smudge).  I have since cleaned the camera lens, but not before photographing tomorrow's project!  Oops.

Hello Kitty Thanksgiving Layout Revisit


It's time for a look back at my favorite Thanksgiving project from 2009.  I really loved this Hello Kitty Happy Thanksgiving layout!  Kitty as a Pilgrim - Kitty as a Native American... Kitty's Thanksgiving feast!  How fun!

 I created this project for Custom Crops and it is still available for free through their on-line store.  There is an article that contains complete cutting and assembly instructions, materials needed and the CUT FILE (!!) - again all for free.


You will need four Cricut cartridges to create this layout - Hello Kitty Greetings, Paper Doll Dress Up, Plantin Schoolbook, and Opposite Attract.  Follow this link to Custom Crops for all of the details.

Revisiting Halloween Past


Yesterday I said there would be a surprise post today - surprising to both of us as I had no idea what I would be making.  Well, sadly what I made was a horrid headache!  The headache stole both my creative mojo and my concentration so the surprise Halloween project I am sharing is from last Halloween.


I really liked this treat box and card set.  The box is the classic matchbox style with a wrap around sleeve and a slide out box. I chose Basic Grey Halloween print paper to make the box spooky fun. I welded the spider web from Paper Doll Dress Up into an oval to make the top of the box for a spooky touch.  I also crafted an oval tag with it's cute little monster and attached the tag to the box. 


I also made a matching card to go with the box.  One of my favorite little goblins received this box (with six fun size candy bars inside) and this card.

My headache is fading so I am hopeful that as the pain goes away my creative mojo will return!  Let's hope so because I have not completed my BBTB2 project of the week yet!

Everyday Cricut Treat Boxes with Happy Hauntings


Hey there!  Today is my Saturday at Everyday Cricut.  Because Halloween is just around the corner I am sharing Halloween treat boxes.  I have crafted five boxes as samples of what you can present to your trick or treaters.


Be sure to go by Everyday Cricut and leave a comment to be in their weekly drawing.  And of course I like comments too!!

Tea & Sweet Shoppe Card AND BBTB2 Blog Hop


Hello and happy Monday.  Welcome to my Tea and Sweet Shoppe!  This week's challenge cut at BBTB2 is the Genie Lamp from the Paper Doll Dress Up cartridge.  I ALMOST went with a cute oasis scene on my card but then I decided to take the road less traveled and add my lamp to a line of assorted teapots.


I have to tell you that I do not think I have ever used this many cartridges on a single card.  I used Paper Doll Dress Up, Just Because Cards, Sweet Treats, Tie the Knot, George, A Child's Year, Dreams Come True, Once Upon A Princess, and Cindy Loo.  Each of the teapots is from a different cartridge, as are the cakes. 


I like the store window effect I created by welding two shapes from George in Design Studio and then adding layers.  And of course I had to add pearls and gems to my sweets and shelving.  I used copic markers and my Ranger white gel pen to embellish the teapots, cups, and sweets.


I kept trying to find a way to add large flowers and ribbon, but the additions distracted from my main store window effect so I did not use them.    Instead, I finished the card by adding a swiss dot cardstock mat inside the card and cutting a "sweet" phrase with the Cindy Loo font.


I believe I mentioned a BBTB2 BLOG HOP!!  Yes it is our blog hop week.  I have some sweet blog candy up for grabs - just leave a message below and you will be in the drawing for a CUSTOM CROPS GIFT VOUCHER!!!  That's right!  Free shopping!!

After you leave your comment below and become a follower if you'd like, you should hope on over to the blog of the VERY TALENTED THERESA!  I cannot wait to see what Theresa made this week; she is such an amazing artist- quickly - go!!

Happy hopping!

Fifty State Paper Doll Swap


I finally finished the paper dolls for the 50 State Paper Doll Swap I joined on the Cricut message board.  Someone kick me the next time I sign up for a swap that does not pre-list the conditions!


I had to make 50 paper dolls, 25 each from two states, Georgia and South Carolina.  We were supposed to make the dolls four inches tall and include accessories.


I made this cute beach scene to represent South Carolina - We do have a lot of fabulous beaches!  My accessories include a Palmetto Palm tree, the state tree, with a tag bearing the state tourism motto. 


For Georgia I had a brain block.  I could only think of Georgia peaches.  So... I made peach farmers.


The baskets were a bit more time consuming than I had planned.  I added a wheelbarrow as an accessory, with the title, Georgia - The Peach State. 


I cut a fill sheet of the peaches at .70 inches.  I used a copic marker and colored the stems and leaves before removing the peaches from the mat. 


I will put my swaps in the mail tomorrow and hopefully they will get to Jen by Thursday.

HO HO HO Jolly Christmas Layout


Over the next few days I share highlights of my new projects at Custom Crops this week.  This first is a cute, cute Christmas layout featuring paper doll elves and Santa. I really like this layout.  And I love how the Peachy Keen paperdoll stamps made the faces look so professional. 


Inaddition to the many Christmas elements - the Elves and Santa, the packages, and the snowflakes, the layout also includes space for four of your favorite Christmas photos and space where you can journal if you would like.  Simply omit the snowflake and packages from the tag on the lower right page and you will have a perfect journaling square.


A close up of the cute little Santa: 


And finally one more look a the two page spread:


Complete instructions and the file download are available at Custom Crops.  There are so many cute Christmas project at CC.... And a sale that ends WEDNESDAY NIGHT!!!!  Don't sit there... click over to CC!!!