Showing posts with label Christmas Card. Show all posts

Another Glitzy Christmas Card


I had such a good time with yesterday's PK GLITZ glitter & overlay card that I decided to use my leftovers and complete a second card.  The only downside I have found to this technique is that I end up sparkling until I shower!  My clothes, hair and face all had a glittery sparkle sheen after I had finished with the glitters.  Perhaps if I were neater...???  Hmmm... There's a thought!


Just like yesterday, I began with a printed 8.5 x 11 inch overlay printed with four Santa images.  I trimmed one Santa from the sheet and saved the others for later.  For this project I decided to start with the white glitter.  I applied the crystal lacquer glue in small amounts to Santa's beard and fur and then I dusted with white glitter.  I continued on to the other colors, just like coloring with markers.  Until I had to complete the skin. 

I did not purchase a skin color, a major over site!  I have since placed an order at PK Glitz for 3-4 additional colors of glitter, but I wanted to finish this Santa while I had it out.  I took a bit of white glitter and added a tiny bit of red to the white.  Mixing well I created a very light pink color and applied that to Santa's face and hands and the baby doll dress. 

To complete the card I used the negative area from yesterday's frames, reversing the layers I placed the plaid on top of the words layer.  And to mix it up a bit, Using the Art Philosophy cartridge I cut the frame in the tiny Christmas word cardstock!  And best of all, I did not glue it down upside down today!!

I used an oval of red cardstock as a background behind the Santa image.   I affixed the negative area frames to the outside edges of a green base card.  Next I layered the red oval, the Santa image - glitter side down - and the tiny word frame.  I attached them to the middle of the green card, leaving a green border showing from the back.  Just like yesterday I finished the card by adding red Stickles to the frame cut outs.


Thanks for stopping by today.  I will be back tomorrow with a Cricut project for Melanie's and Joy's Everyday Cricut blog.  I hope you can come and visit. 

Glitzy Christmas Cards


Are you ready to add some sparkle to your Christmas/holiday cards?  I discovered this fun glitter-glue-acetate technique last summer at the Creating Keepsakes Convention in Charlotte, NC.  The set of supplies that I used are manufactured by PK Glitz.  PK Glitz used to be called Powder Keg and was known for their fabulous hand mixed embossing powders.  And while they do still make the best embossing powders ev-er(!), they also have great mixed glitter colors.

I purchased two sets of glitter "color families" along with the needle tipped glue (crystal lacquer - which dries clear) and two sheets of preprinted acetate sheets.  The glitter color families include sets like FALL HARVEST which have pumpkins and greens, WINTER I & II which contain reds, white, greens or blues, whites and silvers - snowflake colors.  The preprinted acetate sheet cover a huge range of topics - I purchased Christmas themed sheets.  The acetate images are printed four per 8.5x11inch sheets.  PK Glitz also sells overlays (acetate sheets) that work in certain printers.  Below is the nutcracker, glue and glitter selection that I used to create this card.


Working in one color at a time, apply the glue (crystal lacquer) in a small section of the over lay - for example I filled in the rosy cheeks with glue and then applied the red glitter.  Shake off the excess glitter and continue working in small areas.  On this card I started with the reds, the cheeks, the sleeves, and the jacket front halves.  After completely filling in the image with glue and glitter I set it aside to let it completely dry.


Using Little Yellow Bicycle's new Christmas line of cardstock and the Art Philosophy cartridge I cut the remaining elements for my card.  I cut a frame (in large Christmas word cardstock) and the icon version of the frame (in plaid cardstock).  I cut an oval in the small word paper (and accidentally adhered it to my card upside down - OOPS!) and placed it on top of the plaid cut.  I then placed the acetate glittered image GLITTER SIDE DOWN on top of the little words.  I topped this with the frame cut.  This acetate sandwich was affixed to the front of the green dotted card.

Using red Stickles, I filled in the corner decorative cuts in the frame.  I also added a few red Stickles dots to the inside edge of the oval frame (placing the Stickles onto the acetate).

This technique is fun to play with and best of all, it offers a unique way to create pretty FLAT cards that will go through the mail nicely.  If you are interested, PK Glitz has starter sets that contain the tools you will need to begin using the products - and you get to choose your starter color family. 


 Thanks for stopping by today, I will be back tomorrow with another Christmas project.   

Christmas Card Prototype with Scraps


My husband and I are "old school" in many ways. For all of our techno gadgets and computer sauvé, we still send out a lot of Christmas cards - using real mail - the post office - stamps and everything. In recent years I have cut the list down to about 70-75 cards. With that number in mind, and knowing that I like to make my cards myself, I have been looking for a simple Christmas card design that I can mass produce for the bulk of our Christmas card list

I recently ran across a die by Sizzix - Bigz XL Die : ALBUM, CHRISTMAS TREE BY RACHAEL BRIGHT. I found this die on a GREAT sale at Oh My Crafts. The normal price on this die is $34.95 but I found it on sale $8.00!! Seriously, $8.00!!  As I added the links to this post I found that the price of the die is now 3.5 times what I paid for it.  Guess I should have shared my find sooner!

This die actually cuts the pieces for an album, but I found that by not cutting any "pages" and just going with the front and back pieces I could use this as a Christmas card. I cut this sample card using scraps only and I would change the colors/prints in my final cards. With that said, tell me what you think of this as a Christmas card!! I could add a small nestability cut stamped with a "Merry Christmas" sentiment to the lower right edge of the tree. But overall, I am looking for feedback on what you think of this design.  I appreaciate any feedback.  Thanks


Quick and Simple Christmas Card


Once again I have been playing with the Close to my Heart Art Philosophy stamp set.  This time I made a very quick and simple Christmas card. 
I stamped to Christmas trees, cut them out and accented them with buttons.  I then used pop dots and attached the trees to a red card.


Next I stamped the phrase, "A Wonderful Season of ... Hope, Joy, Love"  on the card with embossing ink.  I then added sliver embossing powder and heat embossed the phrase.

The "snow" at the bottom of the card was hand cut from a scrap of white cardstock and scattered with a few additional buttons.


While this may not be my most detailed or exciting Christmas card ever, it will certainly do as a simple card for an acquaintance.


My First Art Philosophy Project


I just couldn't stand it, I HAD to play with my Art Philosophy cartridge and Close to my Heart stamps yesterday!!!  I had actually put together a schedule for the week.  The schedule included two lists - one of tasks to accomplish in my house and the other a list of scrappy projects for the week.  According to the infamous list, I messed up yesterday.  According to my degree of happiness I think I did the right thing!!!  My bathrooms WILL be cleaned today!  And I will finish cleaning the scrap room, only because I messed it up (again) after I spent 5.5 hours there yesterday!!


Do I even need to tell you that I used only one cartridge to create this card???  And only one set of stamps???  I cut the card shape on page 45 of the manual, cutting at 6.5 inches.  Next I cut as a background in black and then a bit smaller in blue and berry print. I then cut the decorative frame layer on the reverse side of the paper, a dark red. 


I cut three flowers () from page 39 of the manual.  I cut the flowers in white lightly textured card stock and stamped them with the coordinating Close to my Heart flower stamp.  I used a Blush color Copic around the edges of the flowers and in the centers.  I left the decorative details on the flowers white. 


I attached the flowers with pop dots and trimmed them out with sticky pearls.  I added two thin strips of ribbon as an additional border.  I finished the card by stamping the sentiment "A Wonderful Season of.... Joy, Hope, Love".   Both of the stamps I used on this card are included with the Art Philosophy package from Close to my Heart. 


If you would like to know more about the CTMH Art Philosophy set, visit Melanie's CTMH site.  Also, Melanie is doing a week of Art Philosophy projects at her blog, Courtney Lane Designs

I will be back tomorrow, hopefully with clean bathrooms, with a fun project from Tie the Knot.

Christmas Berry Card & Blogger Up Date


Hello again blog-land. For those two hermits out there that were not aware, Google Blogger has been down for the last two days.  It "ate" comments and scheduled future posts, in addition to locking out the blog owners.  For those of us who are far too involved in our on-line lives (can you say, Get a life, Susan?), this was very stressful!  And worst of all - It interrupted my Berry Week!  I guess you will get yesterday's berry project at some point in the future.


Today's berry card is "Christmas Berries".  And no, this is not a real plant.  I took one of the Christmas berry cuts from the Christmas Noel cartridge (which can be referred to as Christmas or Christmas Solutions) and crossed it with a pine stamp, creating a hybrid Christmas berry branch!  I then topped the branch with this sweet little red bird (wonder if he ate too many red berries?).


I went back to the Preserves cartridge and found this great shaped matting.  I cut the shape in dark brown cardstock and white with green print cardstock.  On top of that I added two oval mat cut with George .  I stamped the Merry Christmas sentiment with a Stampin' Up stamp and SU ink.  I tied a red Christmas tree ribbon around the card topper before attaching it to the cream colored base card.


Inside the card I used another Stampin' Up Christmas stamp to add a message.  There is still plenty of space to sign the card and add a personal message.

The base card was cut in speckled cream cardstock and red, green and cream stripes.  I used mono adhesive and attached the stripes to the cardstock BEFORE cutting the base card.  I then positioned the cardstock on the mat so that 3/4 of an inch of the stripes would cut with the card.  The base card was cut using Christmas Cheer.


I am hopeful that blogger continues to function properly and that this post does not get lost.  If there are no service interruptions I should be back tomorrow with another new project!!

Feastive Wreath Card with Joys of the Season & Heirloom Ornaments Nesties


Oops!  I *just* checked my blog and discovered that it never posted this morning.  So sorry.  
I was wrapped up in Christmas cards and had not anticipated that blogger would mess with  my post!

It's a festive Christmas BBTB2 Monday and I have a new project to share.  The challenge cut of the week at the Bitten by the Bug 2 blog is the wreath from the Joys of the Season cartridge.  My confession is I had never cut this wreath before.  But after this weekend it just may be one of my favorite cuts from JOTS.  Isn't it funny how we can be introduced to new cuts even when we are part of a design team?  That is one of the best parts of a design team; well that and the wonderful design team sisters!

Do I even need to tell you that I used Cricut Design Studio to design my card?  The Gypsy would have worked just as well, but I am addicted to using my laptop.  I placed two of the wreath shadow cuts onto the mat, flipping the second wreath so that it was a mirror image of the first.  I used the Hide Select Contour feature and removed the open centers from both shadow cuts.    I nudged the two shadows together and welded each so that they would cut as my base card.

I cut the top layer of wreath in a light green Core'dination cardstock, and the accent leaves in a medium Core'dination cardstock.  I added highlights with Copic markers.


For the center of my card I used the two smallest sizes of Heirloom Ornament Nestabilities.  I used a decorative stamp on a piece of smooth white cardstock and stamped in red and cut out one of each size ornament from the image.  I then cut out the center part only of the second from smallest ornament and stamped it with an ornament stamp and a Merry Christmas sentiment.  I added the three ornaments to the card using pop dots.  Pen accents were added on the ornaments and on the card to represent the ornament hangers.


From the side you can see that I used deeper pop dots for the ornaments and smaller dots forth accent leaves.  For the berries, I used a 1/4 inch hole punch and glued the dots to the wreath. As a final touch I added the fun red and white striped ribbon to the card. 


Inside the card I cut a four inch circle and stamped a Christmas greeting in black Staz-On ink.   Below is a final look at the card.  While I love the heirloom ornaments, this card would be cute with a Cricut cut sentiment in the middle of the wreath. One last comment, this card goes together quickly so if you still need to create a few cards, this card would be perfect for last minute Christmas Cards. 

Nesties and JustRite Stamps team up for Elegance


Is everyone still "stuffed" from Thanksgiving??  We are looking forward to "round 2" today with the leftovers!

Before we get into the details of today's card, I want to announce the winner of my DVD set, It's a Kid's Life, from the Kickin' Off Christmas blog hop.  The winner is

Melissa (who) said...
This card is absolutely gorgeous!

 Melissa I will need your shipping address so that I can get a package in the mail to you!!  Congratulations!


And now on to my Christmas card....  This card was created using white cardstock as a base card and green textured cardstock as a front matting.  I stamped the candle image and surrounding circle onto smooth white cardstock.  After coloring the candles, bow and greenery with Copic markers, I used my circle nesties to cut out the candle image.  I then used to scalloped nesties to cut a small red matting and a larger green matting. The three layers were glued together and set aside.


I used the base layer of my nestie charm to create the pretty printed background matting.  I attached the three layers with the candle image to the center of the charm and affixed the charm to the front of the card.


I used Peel Off Christmas phrases to add greetings to the cards, as well as two different ribbons to create a different feel for each of the cards.  Where the print ribbon creates a sassy, fun card, the solid ribbon creates an elegant card.  In both cases I finished the cards with white gel pen doodles.


Depending on my post-Thanksgiving recovery and decorating schedule I may or may not return tomorrow with a new project.  I will keep both of us guessing!

Embossed Christmas Trees With SP & Co. Stamps


Yeah, it's the weekend!!  I love the weekend - there should be fewer weekdays and more week end days!  Can any of you arrange that?

Last week I posted my first two cards made with Samantha's, SP and Company, Christmas Tree stamp set.  I mentioned that I had stamped the trees on pink textured cardstock and embossed the print.  This is the card I made with those embossed trees.


I used embossing ink and burgundy embossing powder to create these four trees.  Each stamp was loaded with embossing ink, then stamped onto the pink cardstock.  Burgundy embossing powder (from PK Glitz - formerly the Powder Keg) was applied over the ink and heated with a heat embossing gun.   The effect created with the hand mixed embossing powders is a medium thick embossing with touches of sparkle mixed in the color. 

Using micro tipped scissors I cut out each tree and saved them along with a 6 x 6 square of the pink cardstock.  Last weekend I pulled out the set aside elements and created this card.

Using the Spellbinder's Wizard and Nestie Label #1, the label shape was cut out of the middle of the pink cardstock, creating a label shaped void - and a perfect spot to layer and pop the trees!  The pink cardstock was then trimmed to fit on the front of the burgundy card.

Using assorted sized half pearl embellishments and holographic peel offs, the trees were decorated prior to being layered and attached to the card front.  A Season's Greeting peel off sentiment was added to the front of the card along with half pearls in the corners of the pink cardstock.  Finally holographic peel offs were added to frame the front of the card. 


I have enjoyed using the SP and Company stamps and will be making at least one more Christmas card using this set in the next couple of weeks.  I will be back tomorrow and start another week of Thanksgiving themed projects.

Sweet Chrismas Card with JustRite Stampers


Thanks so much for all of the super-nice comments on yesterday's Advent Calendar.  I am pleased that you liked the calendar as much as I did.  But let's be honest - that is a tough project to follow!  I realized that anything I posted today would be a let down.  So, I decided to cop-out and continue with the Christmas theme and share a fun Christmas card!

While this card does not begin to compare to yesterday's project, I really like this card.  It is sweet (ha ha ha - I crack myself up) and simple and fun.    The card was created using Spellbinder's nestabilities (label eleven and circle and scalloped circle dies), JustRite Stampers' Merry Little Christmas stamp set, and a candy cane cut from Cricut's Christmas Cheer.  The other card elements - Bazzill cardstock, snowflake paper, and the ribbon - were from my "stash". 


The candy cane was cut on the Cricut expression using smooth white and red Swiss dot cardstock.  After being tied with bit of Merry Christmas ribbon the candy cane was attached to the pink label with pop dots. 


The JustRite Stamp images were stamped onto smooth white cardstock and then cut out with a circle nestabilities.  The scalloped circle was cut in the same Swiss dot cardstock.  The layers were adhered together and then affixed to the card using pop dots.  The card was finished with a strip of Merry Christmas ribbon and bow and white dots and doodles.  

I will be back tomorrow with a new project to share - probably not another Advent Calendar - sorry!  :-)

Christmas with Nesties and Cricut


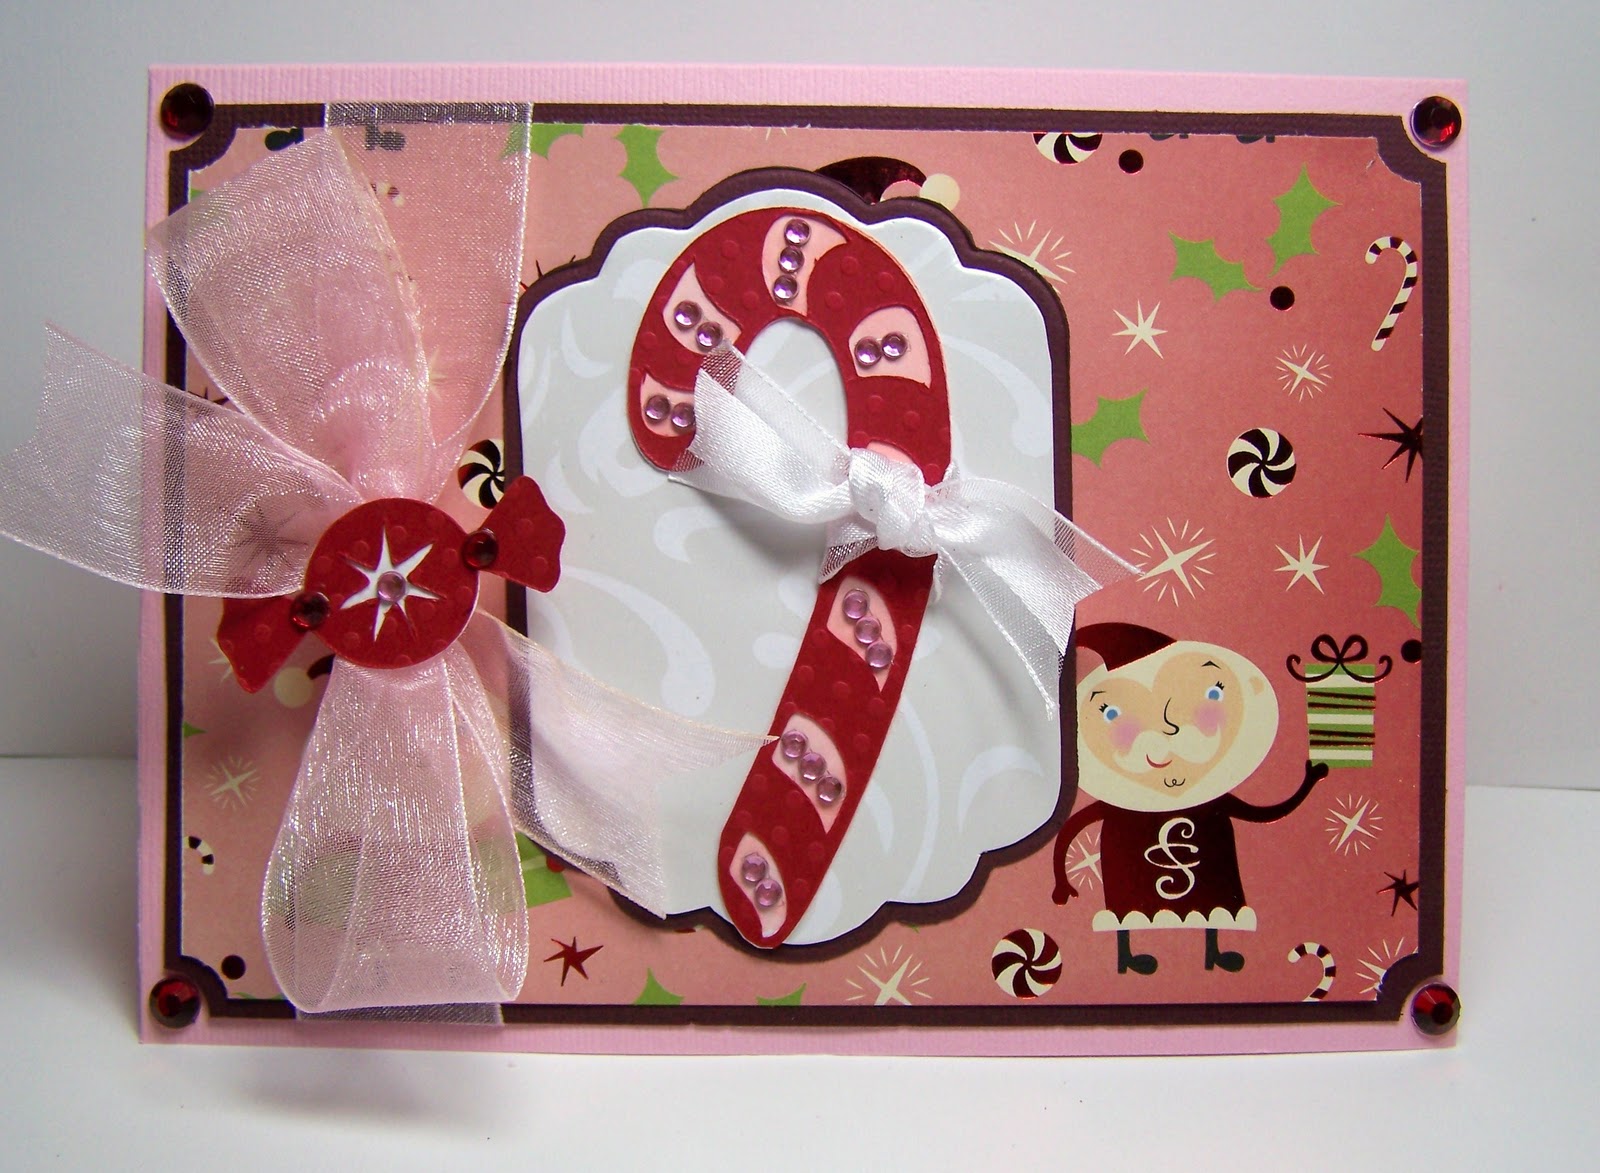
I was a bit of a slacker yesterday and did not post a new Christmas card or project.   I thought more people might see Samantha's wonderful stamps if the post remained at the top of my blog for two days.  However, it is time to move on to another fun Christmas card.  This card features fun paper with Christmas candy!


I am going to confess that this card began as a pile of leftovers on my desk.  I had leftover maroon cardstock, sheer pink ribbon, and the white nestie label all leftover from previous projects.  I decided to free the leftovers from a life on "the Island of Misfit scrap goods" (think Rudolph and the misfit toys) and combined them to create this cute card.  


I created a card from a half sheet of leftover pink cardstock and affixed the fun Santa & candy paper to the base card.  The ribbon, tag layers and corner gemstones were added.  Finally I added a cut candy cane to the front of the label and blinged it out with pink gems.


The inside of the card should satisfy anyone's sweet tooth; it is filled with candy and stamped with two Stampin' Up sentiment stamps.


I will be back tomorrow with a quick post showing you some of the Christmas cards I plan to send out the year.

 In the meantime, I will be spending the day with my son has he turns 25!  Happy 25th birthday Aaron!!

3-D Merry Christmas Card with Peel-Off Embellishments


I don't know about all of you, but I am SOOOO glad that all of the political ads will no longer be on the broadcast media today.   I can turn on the stereo in my minivan or the TV in my scraproom and not want to pierce my eardrums.  And with the end of the campaign season comes a focus on the coming holidays.  Speaking of broadcast media - we do all realize that some crazy radio station is going to start playing Christmas carols any day now??  Give me Christmas carols over campaign ads any day.  Hey - maybe there should be a new rule that all political ads must be sung carol style??  :-)


So on to today's Christmas card!  This card began with the center green and gold circle and it's attached gold leaves.  This piece was purchased as an open circle with the gold accent center, two gold stems of leaves, and two flowers.  I just spent the last hour trying to find the link to exactly where I purchased topper piece, but alas I cannot find it.  As soon as I spotted this embellishment I knew I was going to use it to make a Christmas card.  I added a gold peel off around the green portion of the topper and an additional flower and gem center.  I also spread out the leaves a bit and began the process of selecting paper. 


As I said above, the center of the circle was open so I began by selected paper that looked nice as a background in the middle of the circle.  I cut a 3 inch circle of this pretty red/burgundy/pink color and attached it to the back of the green circle.  I then added peel offs to the center of the circle, a single drum (from the drummer boy) and the Merry Christmas phrase.

I found this pretty antique looking paper in my stash.  I cut a large square of the red/burgundy/pink paper and affixed a small square of the antique-look paper on top.  I trimmed the edges with gold peel offs.  I then attached the circular embellie to the front of the card.

The inside of the card is white with a single Christmas red poinsettia embellishment.  This card will probably go to one of my neighbors as it is both heavy and textured (and the USPS does hate those lumpy cards!).  


I will be back tomorrow with yet another Christmas project to share.