Showing posts with label Christmas. Show all posts
BBTB2 Deck the Halls & Ornament Layout
Happy Bitten by the Bug 2 Monday! This week's challenge cut is a "two-fer". My lovely design team sister Jeri selected a two part challenge, Ornament 1 or 2 *and* the Deck the Halls phrase from the Winter Frolic cartridge. There were sooo many possibilities to use these cuts that I was almost overwhelmed by the challenge.
At first I designed a Christmas card using ornament 2 and the challenge phrase, but then I realized that I was in the mood for a layout. My ventures in paper crafting began with scrapbooking and I still love to create scrapbook pages. For this 12 x 12 scrap page I started with a blank base page of light, light pink cardstock. To the blank background I added the cricut cuts and Christmas morning photographs of my children.
The Deck the Halls phrase cut was created with three cuts: A smooth white cardstock shadow layer, a red metallic base layer, and silver metallic top layers. I did not use all of the silver cuts because I liked the contrast of the red metallic on the white cardstock.
The looped edge full page was designed in Cricut Design Studio. I placed the loop edge border from the Cake Basics cartridge, welding four sets of loops together. I copied and pasted the row of loops until I had four rows. Using the "Turn 90" degree turn button, I turned three of the rows so that the loops all faced outward. I then welded the loops to a 9 inch round edged square from the George cartridge. Using a full sheet of SEI paper, I cut out the loop edged mat.
Next I cut out three Christmas ornaments, two from Winter Frolic and one from Joys of the Season. I cut the shadow layer of all three ornaments in smooth white cardstock. I used scraps of SEI, Bo Bunny, and Bazzill cardstock to cut the top layer of the ornaments. A circle from George was placed inside each ornament, but was NOT welded. The circles cut out and made windows for the photos.
If you use the cut file - which is available to download from the side bar with the title "Deck the Hall & Ornament Layout" - you will see that there is one page which contains all of the metallic silver cuts. I actually cut two of the scalloped frames on a different page so that they could be cut in red and green metallics. They would have looked nice cut in silver also. I trimmed the top of each ornament with ornament print ribbon.
To assemble the page I began by attaching the looped matting to the light pink base. I then added the large silver frame. Next I affixed the Deck the Hall phrase into place. And finally I added the three ornaments to the layout.
Be sure to go by BBTB2 and check out the amazing projects the created by the Design Team. These women are FABULOUS designers!!!
You know, I am not sure that my children would appreciate that I placed Christmas morning photos on my blog for all the world to see, but I won't tell them if you don't!!
Labels:
BBTB2,
C- Joys of the Season,
C-Cake Basics,
C-George,
C-Winter Frolic,
Christmas,
Layout
Happy Thanksgiving!!
Happy Thanksgiving! I hope you are having a wonderful day with those you care about most. I have all three "children" home, my husband, our dog, Duncan the wonder dog, and my "grand-pup", Magnus! It seems like a house full even if it isn't!!!
Earlier in the week I promised to post more photographs with better visual details of my North Pole house today. Click on any of the photos to see them larger. The house was cut using the Happy Hauntings spooky house. I know there ARE 3-D Christmas houses on other cartridges, but I like the details on this house and thought it would decorate well. I especially like the to roof sections and the widow's walk area. I cut the sides of the house in red Swiss dot Bazzill card stock and the roof and porch pieces in smooth white card stock. Everything was cut at seven inches.
I used Zip-Dry glue to assemble the house, because it does dry so quickly. I also found have paper clips and mini binder clips available to hold sections together while they dried to be beneficial. I love that Provo Craft included step by step assembly instructions in the back of the Happy Hauntings handbook.
After I assembled the basic house, I began to decorate. The first step was adding the snowflake buttons to the edges of the roof pieces. I used a 1/8th inch hole punch and punched eleven holes in the edges of the roof (because I only had 12 snowflake buttons and I did not want to risk one breaking and not having enough). I added glue to the back of the buttons and inserted the button loop through the little hole, securing the buttons to the roof.
Next I began adding Christmas buttons: Rudolph, two wreaths, and two candy canes. I glued the red candy canes to the roof section around the gable. I added Rudolph to the very top roof section. I placed one of the button wreaths on the front door and the other over a circle window above the side porch.
Next I used gold thread and hung the mini lights on the widow walk railings. I added dots of glue to the thread to secure it into place.
At this point I still had miniature evergreen trees, bushy evergreen wreaths, eight strips of red beads, a bag of iridescent shred, and a bag of iridescent snowflakes. I decided to glue iridescent snowflakes to the sides of the house. I am not sure where this idea came from, but I really liked it and added snowflakes all over the house. I set aside the remainder of the snowflakes. I then added red beads around the top roof section, the balcony edge, the side porch roof, and the front porch rails and steps. I added fuzzy wreaths to two windows and to the cellar doors.
I applied big swirling loops of glue to a deep red charger and spread some of the shred onto the glue. I then add big swirling loops of glue over the shred and set the house in the middle of the charger. I glued the miniature trees around the house to the charger.
I found my leftover iridescent snowflakes and using small dots of glue, I added the snowflakes over the shed and around the edges of the charger.
The last element added was the North Pole sign. I found a leftover holiday cardstock sticker and wrote North Pole. I stuck the sticker onto a strip of clear plastic and affixed it in the shred.
I was truly very lucky that the house came out this nicely. I think one of the big factors was the iridescent snowflakes and the shred. I was lucky to happen across both at the craft store!!
Labels:
C-Happy Hauntings,
Christmas,
Michaels Contest
Kickin' Off Christmas Blog Hop Day 1
Welcome to the Kickin' Off Christmas Blog Hop! You may have arrived here from Penny Duncan blog. This blog hop will feature SP and Company Products and Amy Chomas Products. Both companies off have wonderful and unique crafting tools.
Now that I have finally begun my Christmas shopping I have also begun to think about packaging and wrapping. I love nice packages and bows and tags.... And I love the look of the packages under the tree. This year I thought I could craft a few personalized boxes and bags just to make things a bit more special.
For today's box I used the square box on the Bags, Tags, Boxes, and More cartridge. I cut the box in red cardstock and covered the top and side squares with fun Christmas scrap paper.
Using Stampin' Up Red Riding Hood red ink and SP and Company Christmas tree stamps, I stamped red trees onto smooth white card stock. I used micro tipped scissors and cut out the trees. The trees where then attached to the sides of the box using pop dots.
Next, returning to the Cricut I used the Amy Chomas gel pen holder and the Create a Critter cartridge and wrote the word JOY on red cardstock. I used the Storybook cartridge and cut a tag shape around the work JOY. Using pop dots the red tag was affixed to the top of the box.
I also created a matching gift card to go with the gift box. I cut a white base card and attached a red cardstock square topped with fun Christmas paper to the front of the card. Just as I did for the top of the box, I used CAC and SB to create the red tag for the front of the card. I also popped a stamped tree to the front of the card.
Before you hop on be sure to leave a comment below. Everyone who leaves a comment will be eligible for a Custom Crops gift voucher drawing. Remember that Samantha is also giving away a stamp set. And finally, I will be giving away a copy of my DVD set, It's a Kid's Life - which features 18 layouts, video and pdf instructions along with cut files. I will choose someone from all of the Tuesday and Wednesday comments.
After leaving your comment below, the next stop on the blog hop is the Cards by Linda blog. Enjoy your hop!!!
Hello Kitty BBTB2
Happy Bitten by the Bug 2 Monday! Such a fun week is in store for all of us! Of course with Thursday being Thanksgiving Day here in the U.S. this is already a special week! But on top of that, today is BBTB2 with HELLO KITTY (you KNOW I ADORE Kitty!), tomorrow is the first day of the Kickin' Off Christmas Blog Hop as well as my 29th wedding anniversary(!), Wednesday is day 2 of the KOC Blog Hop, Thursday is Thanksgiving and I will share the details of my North Pole house, and Friday is BLACK FRIDAY! I think MFK (my friend Kathy) and I are planning a Walmart run!!! And of course in the midst of our crafting fun I will be preparing the traditional big meal as well as a finger food buffet for Wednesday night. Whew! Busy week.
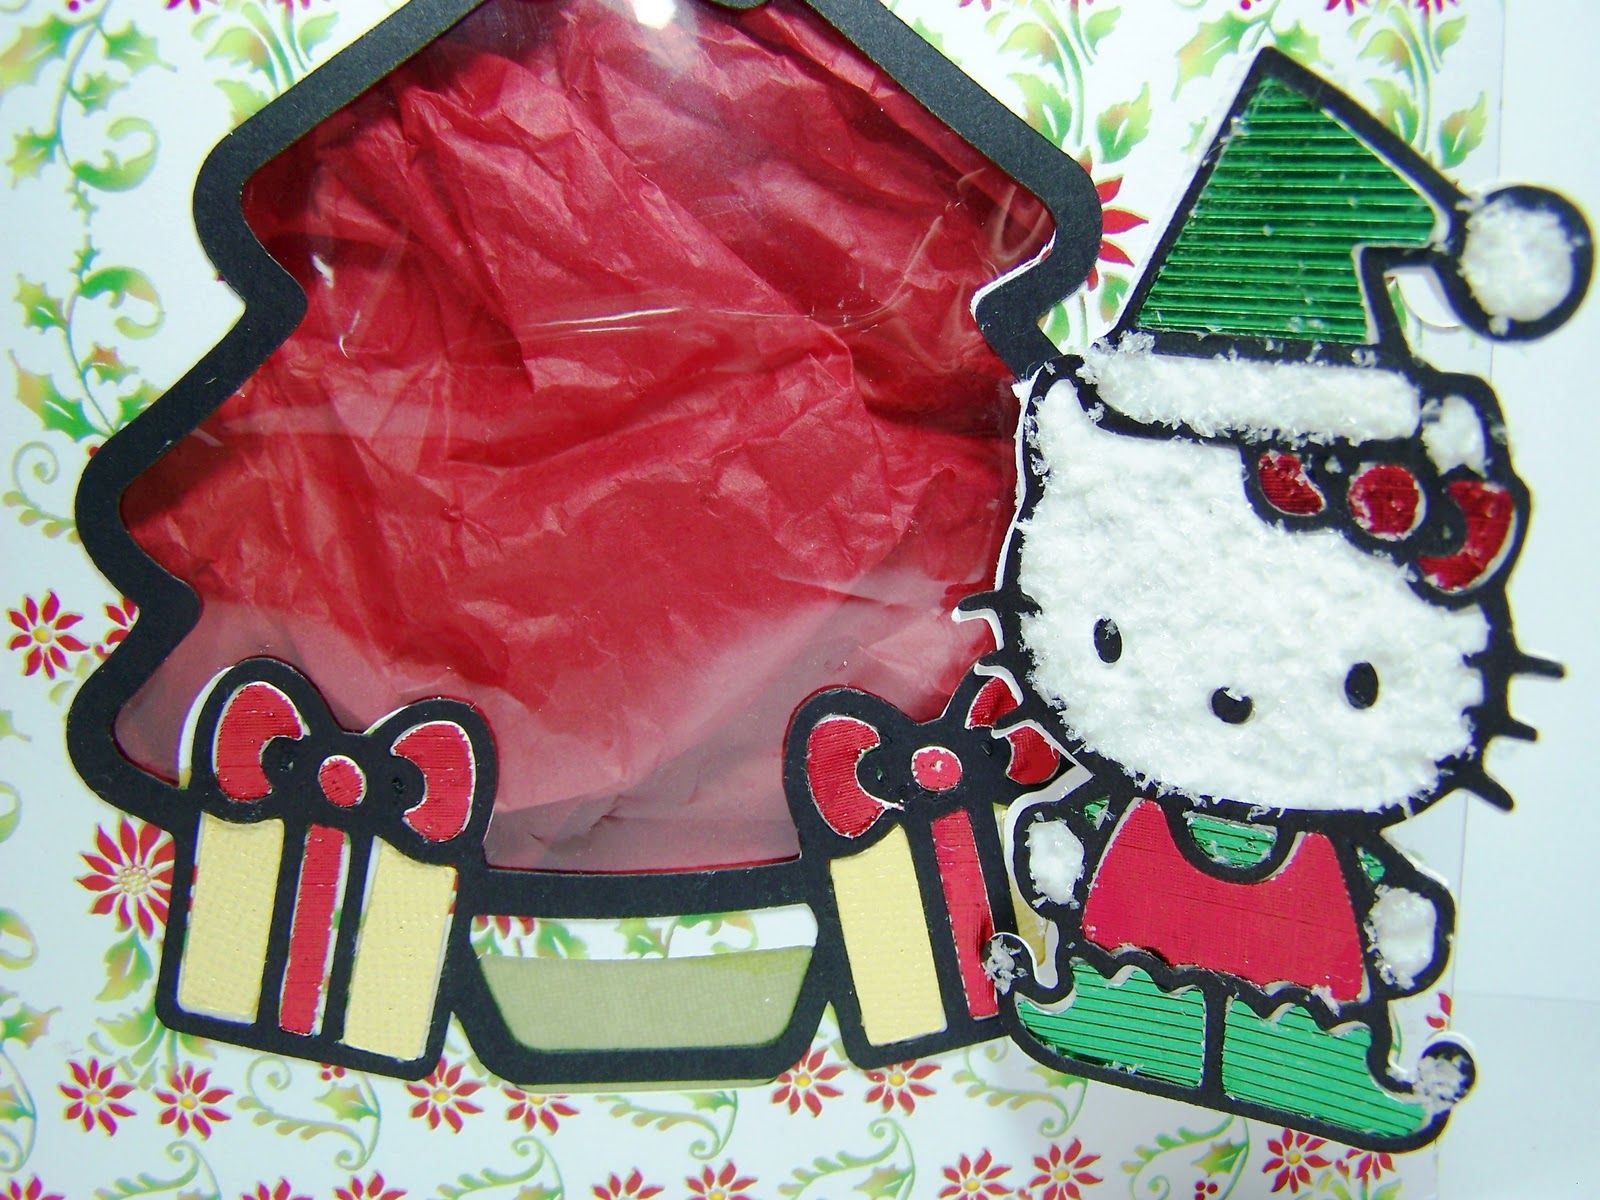
The challenge cut this week at BBTB2 is Hello Kitty in her elf/Santa outfit (HK19). This cut was selected by my sweet Design Team sister and team leader Heather, who probably doesn't even know about my love for Hello Kitty. I decided to take the HK project a bit further, because I always find inspiration when Kitty is involved.
I started with a basic box from the Tags, Bags, Boxes and More and Cricut Design Studio. I chose the 12 x 24 inch virtual cutting mat and placed the box onto the mat at 9-1/4 inches tall by 17-1/3 inches wide. I decided that I wanted to place the Christmas tree next to Kitty, so placed the outline on the mat at 5-1/4 inches tall by 4 inches wide. I then placed the tree center cut into the front section of the box. I did NOT select weld. This way when I cut the page the shape of the inside of the tree and tree stand only cut out. I glued a square of acetate over the inside of the opening. The tree outline, star and package pieces were cut on the same mat.
A word about the cardstock I used to create this box: The cardstack was purchased through Darcie's when I attended a stamping expo. However, you can order their large printed cardstock on-line. ( I would have added the link but as of Sunday evening as I type this post their site is down). The cardstock measures 18 x 12 inches and is a wonderful weight for boxes and cards cut on the Cricut. Also their printed cardstock comes in a variety of prints - seasonals, birthday prints, manly prints, fun prints, plaids, etc.
Page two of the cut file uses a regular 12 x 12 cutting mat. On this mat I placed the HK19 Hello Kitty card cut at 3.5 inches tall. All of my Hello Kitty pieces were cut with the Cricut set at 3.5 inches. I cut Kitty in white smooth cardstock, her outline in black and her clothing in metallic green and red. After assembling the card front, I applied glue to the white portions of Kitty's body and covered them with white papersoft, creating the illusion of "fur". I then attached Kitty to the base card and affixed them to the front of the box. This assures that the TO/FROM tag will stay on the box.
The last piece of the box ensemble is the Merry Christmas to You tag hanging from the bow. I used my set of JustRite Christmas stamps and scalloped punches to create the tag. I then attached it to the ribbon and bow at the top of the package.
My daughter saw the box on my scrapping desk and told me that she hopes to see the box under our tree with her name in the "TO:" area. I think there is a very good chance that she will get her request!!!
I will see you back here tomorrow for the Kickin' Off Christmas blog hop! The goal of the blog hop is to use Amy Chomas products and SP and Company products.
One last note, please remember that you can vote for Capadia's (Diane) entry in the Creative Memories contest once every 24 four hours. Please click HERE to go vote today and go back and vote again tomorrow!!! Diane is a true delight and has done so much for sooo many in the paper crafting community. I would love to see her win this contest and the cruise.
First Christmas Card of 2010 - Seriously!
No, I am not kidding, I really have already begun my Christmas cards for 2010. Last year I put myself on a card making schedule and it worked wonderfully. I decided that if I crafted six Christmas cards each month, come December I would be all set to mail out my cards.
This was so successful last year that I have decided to do it again this year and this is my first card. I used BasicGrey paper as a background. I used white-washed Core'dination cardstock and embossed the brass Sizzix bell die. I used a sanding block and removed the top layer of white wash from the paper.
I used my rectangular nesties to trim the edges of the embossed bells. I used the scalloped rectangular nestie to cut a mat for the bells.
Finally I cut three foil poinsettias with the cricut and using pop dots mounted two flowers on the front corners and one flat inside the card. The angle of the above photo makes the poinsettia look very scratched up when in reality this is not the real-life effect. As a mailing tip, the cards will fit into an envelop more smoothly if your do not use pop dots. I paid twenty cents extra to mail several of my Christmas Cards this year.
Labels:
Christmas,
Christmas Cards
ElfYourself a Merry Christmas Featuring the Convention Girlfriends
I had so much fun making the ElfYourself family dance yesterday that I decided to immortalize a few of my scrapping friends with another ElfYourself. This dance features "my friend Kathy", Suzanne, Pat and me.... dancing like crazy little elves.
I hope your Chirstmas is full of joy and peace....

I hope your Chirstmas is full of joy and peace....
Merry Christmas!!!
I wish each of you a very Merry Christmas filled with love and family and joy!!!
The photo above is a copy of our Christmas card insert, the 2009 Christmas Newsletter. If you are interested it should enlarge when "clicked" on.
Joyous Noel!!!!
Labels:
Christmas,
Family,
Newsletter
Ornament Making & Cookie Exchange
We used the ornament ideas presented at the Christmas With The Cricut blog (among others) and made both some of the alcohol inked ornaments and the glitter filled ornaments. I made a set of four ornaments for each of my children.
I will say that I LOVE the glitter onaments. I purchased some very pretty Matha Stewart Glitters at Hobby Lobby and also used a few colors I already had at home. My favorite did not photograph well, Rose Quartz. It is so pretty in real life.
I am off to the kitchen to sample another cookie from the cookie/recipe exchange. This women bake as well as they scrap and craft!!! What a great group of women!!!
Guest Designer Gig at Chirstmas With the Cricut
Can you say EXCITED??? I am super excited (or is that Uber-excited?)! I have been selected to be a guest designer for a week in November at the Christmas with the Cricut blog site. Joy, Melanie and Tammy have the most wonder Cricut Christmas site on the Internet. Each week follows the same format, with new projects everyday. For example, today is simple card Monday. I have been so inspired and excited by the daily project that I was amazed when I was approached to be a guest designer.
Saying yes, Yes, YES! was a no-brainer for me: I love Christmas, I love my cricky, and I know that these ladies are just awesome. So no way I was not going to say YES! And I was doubly excited to see that I will be sharing my design week with Jeannie (from A Place for My Card blog). Jeannie is someone that I have never met in person but can just tell from reading her posting on both her blog and the cricut MB that she is a sweet, sweet woman!! I may be in over my head, but I will have great company as I go down!
Jeannie and I will be featuring the Winter Woodlands and From My Kitchen cartridges for our week of as guest designer. I have already designed two of my projects, but I am floundering for the other four....
The guest designer schedule at CWTC for the month of November follows:
November 1-7
Christina (Creations with Christina)
Teresita (Teri Beri's Creations)
November 8 - 14
November 15 - 21
Susan (Busy with the Cricky)
Jeannie (A Place for My Cards)
November 22 - 28
Monique (Monkey Doodle Cricut)
Mandy Ferg (The Polka Dot Spot)
BBTB Pooh Gift Box
Happy Labor Day! I hope all of you (at least in the US) are enjoying a day with your families and friends and not missing work at all!
This week's challenge cut at BBTB is the gift box on the Pooh and Friends cartridge. I have been in a Holiday mood, focusing a lot on Halloween and Christmas projects this week. So... I decided to use JOTS and make a Christmas card. Probably not too original, but as I said I have been rather single-minded in my Holiday themes of late.
Also while I have you here let me encourage you to stop back later in the week. I will have four new projects release this week at Custom Crops (which I will preview here) and also I have been working on a couple of projects just for me (which I will also preview here). I look forward to sharing those projects with you this week.
Labels:
BBTB,
C-Joys of the Season,
C-Pooh and friends,
Christmas
Milestone Number WInner - Karen!

We have a winner: Karen McPherson! Karen guessed 10,122.... Of course Randi guess 210,00!!! Yikes!!! But Karen came the closest.
The real milestone number reached was 15,000.

Some blog writes will probably roll their eyes at ONLY 15,000. But I am honored that so many of my files were downloaded. It is a statement to the Cricut as well.... How much we all love this amazing machine and truly (and sappy) how it has changed our paper crafting.
Finally, I am sharing previews of a new project .... It was made for Custom Crops .... You can follow the blinkie to the left to my page at CC for articles, instructions and cut files.... all for free.... and for this amazing Holiday Planner. While you are there, I would appreciate it if you would leave a comment on my articles.
Labels:
Christmas,
Custom Crops,
Cut Files
Subscribe to:
Posts (Atom)