Showing posts with label C-Thanksgiving. Show all posts
The One That Didn't Make the Post
Monday's BBTB2 recipe card was not a one of a kind. In fact, it was my second attempt to with the same design. The card above was my first attempt. And while it was a perfectly respectable recipe card, I felt it was missing something - like a top crust, a second flip open layer, and a better embellie!!
I posted this version of the card so that you might know that those of us with blogs do not get it right every time. Sometimes I post a project that I do not love, but often I have been known to re-craft a project if time permits. Monday morning time WAS permitting....
At bedtime Sunday evening I was suddenly hit with a kidney stone. After managing to finally fall asleep, I woke up an hour and a half later at 4:00 am and could not go back to sleep. So I thought to myself - you were not happy with your blueberry pie card... why not try again? So yes, that was how I entertained my sleepless self!
I am feeling much better and think I am almost back to normal. I did some cleaning yesterday after my CTMH set arrived, though truthfully I wanted to go play in the scrap room. Guess what I plan to do today??? :-)
Blueberry Pie Recipe Card with BBTB2
It's a Bitten By the Bug 2 Monday here at Busy with the Cricky. This week we are making pies!!! My sweet design team sister Krista Norman chose this week's challenge cut, the pie from the Paper Doll Dress Up cartridge.
What Krista could not know is that I will take pie any day over cake. Don't get me wrong, I like cake, but pie is really my thing!! I love the fattening flaky pie crust and the yummy fillings. When I was at the lake last month MFK, my friend Kathy, brought a gallon of blueberries from her yard for us to enjoy. We had blueberries in yogurt, blueberries in cereal, blueberries in salad, Kathy's blueberry crisp, and finally, blueberry pie. We found the recipe below on the Internet, but let me tell you, it is a keeper!!! I have made it for Doug and I since returning home.
I decided to use the pie off of the Thanksgiving cartridge, but I hand trimmed the swirls of "steam" off of the pies. I welded two pie cuts top to top so that they would open like a card. I then cut the entire pie one more time in green gingham. I cut just the pie top in a blue floral print and topped it with a lattice cute. I used the lattice tag on French Manor to cut the pie lattice.
I used both Cindy Loo and Martha Steward Seasonal Art Cake cartridges for the fonts. I love these two font, Cindy Loo is so sweet and whimsical, while the MS Seasonal font is so versatile.
Inside the card I printed the pie recipe into two rectangular text boxes, measured to fit the inside of the card. I am not sure if I have shared this recipe previously, but you can copy it from the text below.
Blueberry Pie
Ingredients
• 3/4 cup white sugar
• 3 tablespoons cornstarch
• 1/4 teaspoon salt
• 1/2 teaspoon ground cinnamon
• 4 cups fresh blueberries
• 1 recipe pastry for a 9 inch double crust pie
• 1 tablespoon butter
Directions
1. Preheat oven to 425 degrees F (220 degrees C).
2. Mix sugar, cornstarch, salt, and cinnamon, and sprinkle over blueberries.
3. Line pie dish with one pie crust. Pour berry mixture into the crust, and dot with butter. Cut remaining pastry into 1/2 - 3/4 inch wide strips, and make lattice top. Crimp and flute edges.
4. Bake pie on lower shelf of oven for about 50 minutes, or until crust is golden brown.
I finished the card by adding a stamped expression to the front of the card. The stamp is part of the all around sentiments set by Joy at Joy's Life. I adore Joy's stamps and this all around set is awesome. I used a round paper punch and a scalloped paper punch to create the stamped tag.
Be sure to stop by the Bitten by the Bug 2 blog and check out the design team members awesome pie projects. Also, consider playing along and posting your project in the Mr. Linky spot at BBTB2. Each week there is a play along winner who receives a special blog blinkie!.
Everyday Cricut Hostess Set with Thanksgiving Seasonal Cartridge
It's the third Saturday of the month and that means it is my day as the Saturday designer at Everyday Cricut! Melanie and Joy have returned to Christmas holiday projects, but I wanted to share one last Thanksgiving project. Besides I am doing a week of Thanksgiving projects here at Busy with the Cricky and I did not want to change my theme!
My featured project at Everyday Cricut is a four part Thanksgiving hostess set: place cards, wine glass tags, decorative plate pumpkins, and Yudu printed napkins (previously featured here).
Please head over to Everyday Cricut for more information and additional photos. Thanks for stopping by and have a great weekend!
Give Thanks - BBTB2
It's a Bitten By The Bug 2 Monday morning! Everyone at BBTB2 is giving thanks this week, as our sweet Design Team sister, Donna (Ms. Popsicle Toes herself), selected this week's challenge cut - "Give Thanks" from the Thanksgiving seasonal cartridge. And I know that YOU know what comes next - me telling you how much I love the Thanksgiving cartridge. All I am going to say is - I DO LOVE THE THANKSGIVING SEASONAL CARTRIDGE (that was an excited squeal, not a yell)!
I am a little bit hooked on JustRite Stampers at the moment (could you tell?) and today's card is no exception. This dried corn image is from the Autumn Blessing Borders and Centers set and compliments today's Give Thanks challenge cut quite well. I colored the image with Copic markers and cut the image and the matting using oval nesties. I finished the image with an amber gem in the middle of the bow.
I used Bazzill cardstock to cut today's challenge cut, and again used a single amber gem as a highlight. The cut is adhered to four (4) layers of fall colored matting on a rust colored card. I used the Stampin Up corner punch and two amber gems to embellish the top corners of the card. The card is wrapped in a pumpkin colored ribbon with the nesties images affixed over the ribbon knot.
I will be back tomorrow, and everyday this week, sharing Thanksgiving themed projects.
Labels:
BBTB2,
C-Thanksgiving,
Card,
JustRite Stamps
BBTB2 Banner & Blog Hop
Hello everyone, welcome to the monthly Bitten By the Bug 2 blog hop. You may have arrived here from our sweet Carole's blog, or you may have just dropped in to check out my monthly project. If you did not start at the beginning after you finish here you may want to go to BBTB2 and check out the fabulous banners made by my fantastic design team sisters!
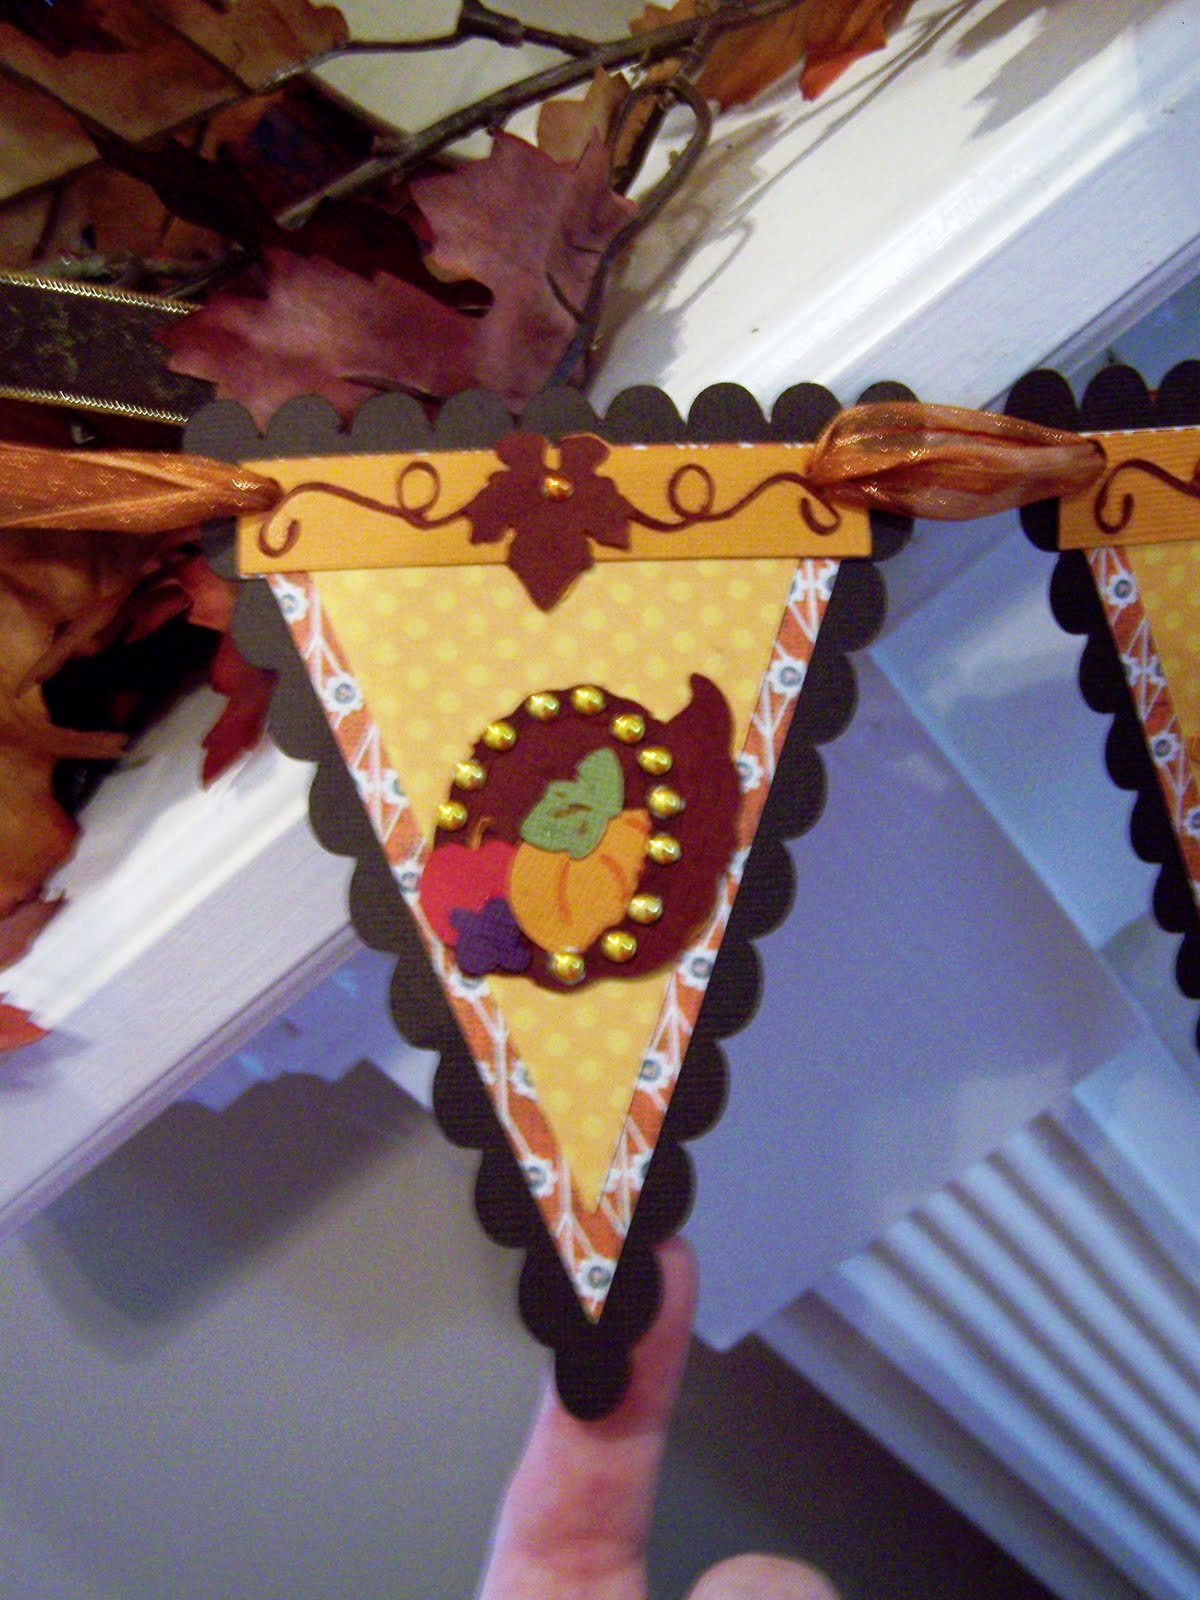
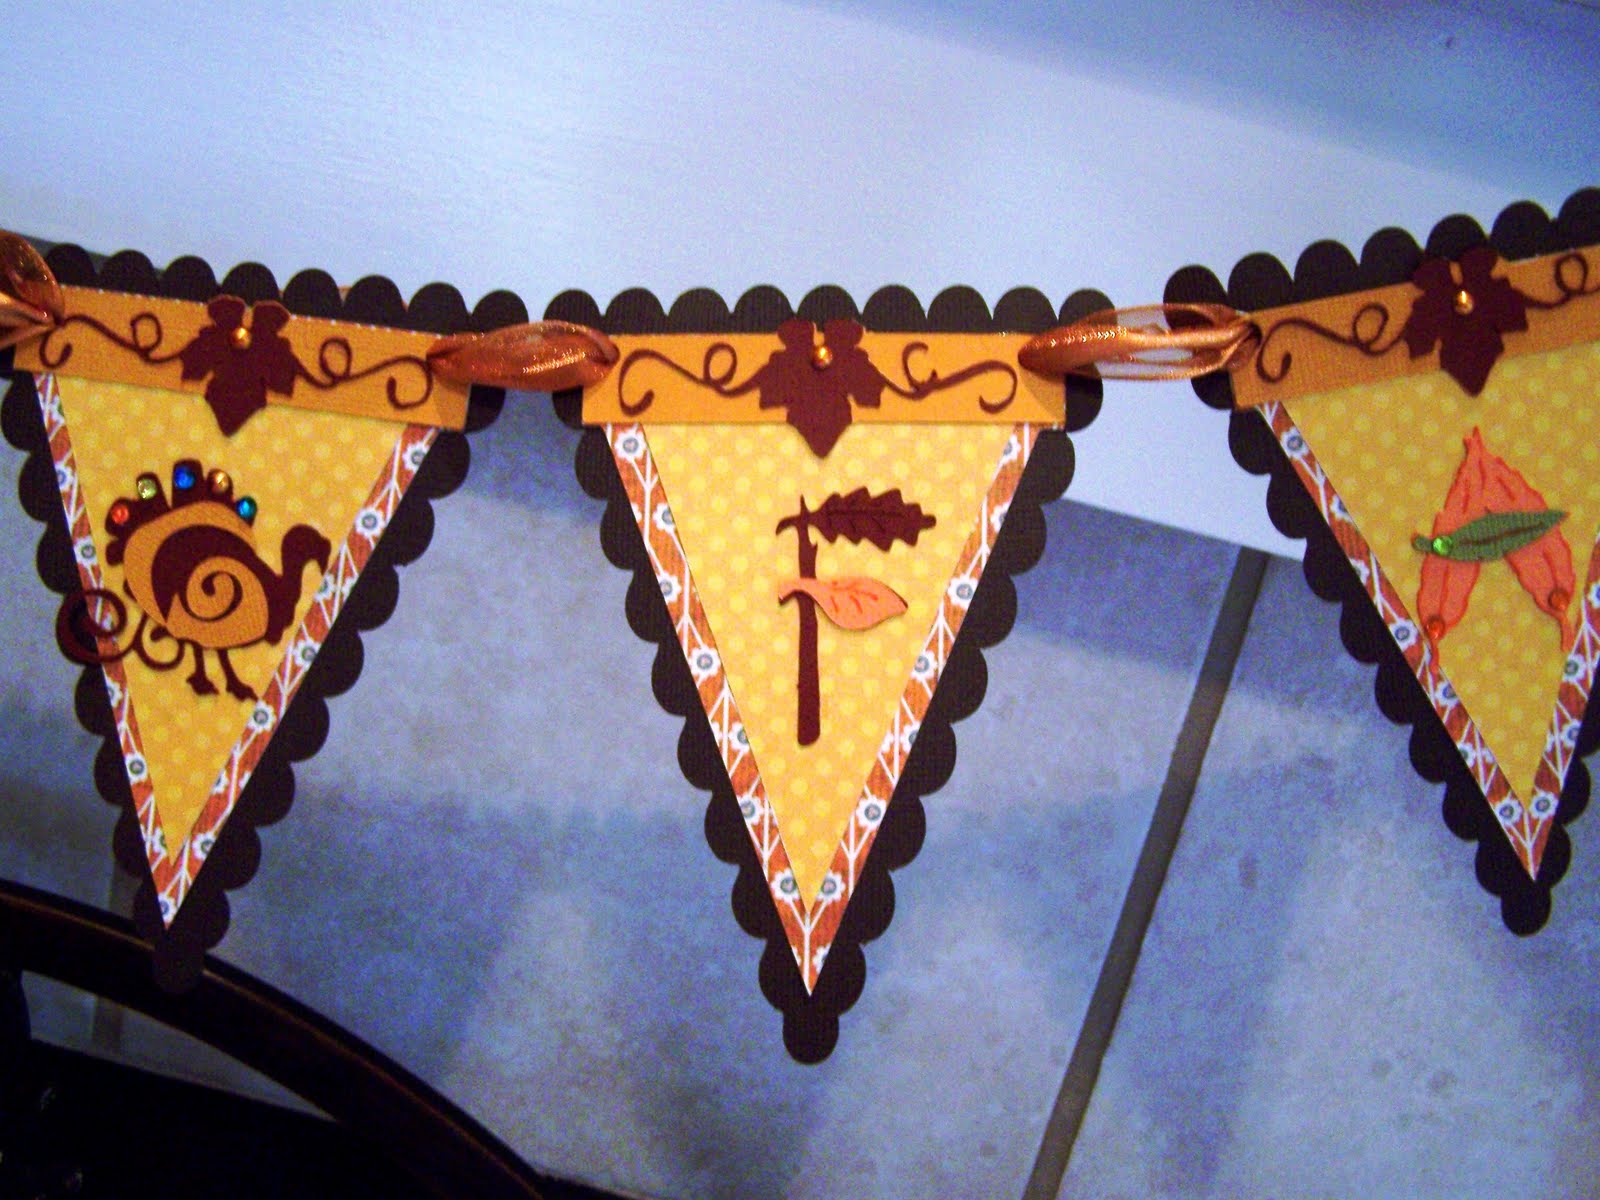
This week's challenge cut was selected by our design team sister, the lovely Beth (Runs with Scraps). Beth asked the design team to use any of the banners on the banner feature from the Country Life cartridge. I do not have this particular cartridge but there are other several other banners on several other cartridges. I used two different banners from two different cartridges to create my HAPPY FALL banner.

The scalloped base banner was cut using Tie the Knot. The floral print banner with the rectangular topper is from Straight from the Nest. I added an additional triangle from George and Basic Shapes to create more interest. The maple leaf flourish decoration across the top of each section is from the seasonal Thanksgiving cartridge, as are the images on the first, last, and middle banners. I used the cornucopia, the turkey, and the corn for the image banners. I finished each section of the banner with the I-Rock and assorted gems.
Orange sheer ribbon was laced through the holes on each section of the banner. I then tied the ends of the ribbon to the iron sconces on my mantel. The orange was a perfect color in that it blends well with the cardstock colors and the leave garland on the mantel. I love decorating for fall and this fun banner added to the overall effect.
So did I mention a blog hop??? Did I tell you that with the blog hop comes BLOG CANDY? What? I forgot to mention that??? I have great blog candy for one lucky reader!!! I am giving away a $25 gift voucher from CUSTOM CROPS so one lucky person will get to do a bit of FREE shopping!!! All you have to do is leave a comment under this post. A random winner will be selected on Thursday of this week.
After you post your comment you will be continuing along on the blog hop. Your next stop is at our amazing Donna's fabulous blog. I cannot wait to see her awesome project; she inspires me every single week!!!
Thanks for coming by today. I will be back tomorrow with another new project.

This week's challenge cut was selected by our design team sister, the lovely Beth (Runs with Scraps). Beth asked the design team to use any of the banners on the banner feature from the Country Life cartridge. I do not have this particular cartridge but there are other several other banners on several other cartridges. I used two different banners from two different cartridges to create my HAPPY FALL banner.
The scalloped base banner was cut using Tie the Knot. The floral print banner with the rectangular topper is from Straight from the Nest. I added an additional triangle from George and Basic Shapes to create more interest. The maple leaf flourish decoration across the top of each section is from the seasonal Thanksgiving cartridge, as are the images on the first, last, and middle banners. I used the cornucopia, the turkey, and the corn for the image banners. I finished each section of the banner with the I-Rock and assorted gems.
Orange sheer ribbon was laced through the holes on each section of the banner. I then tied the ends of the ribbon to the iron sconces on my mantel. The orange was a perfect color in that it blends well with the cardstock colors and the leave garland on the mantel. I love decorating for fall and this fun banner added to the overall effect.
So did I mention a blog hop??? Did I tell you that with the blog hop comes BLOG CANDY? What? I forgot to mention that??? I have great blog candy for one lucky reader!!! I am giving away a $25 gift voucher from CUSTOM CROPS so one lucky person will get to do a bit of FREE shopping!!! All you have to do is leave a comment under this post. A random winner will be selected on Thursday of this week.
After you post your comment you will be continuing along on the blog hop. Your next stop is at our amazing Donna's fabulous blog. I cannot wait to see her awesome project; she inspires me every single week!!!
Thanks for coming by today. I will be back tomorrow with another new project.
YuDu Fall Napkin Set
I found these great pumpkin colored napkins at Tuesday Morning several weeks ago. I thought they were perfect for fall. I actually set up two YuDu screens, but ended up not liking the effect. I had planned to fill the pumpkins in with a second color, but instead I just went with a single color. The second color distracted from the simple elegance of the design.
I cut the pumpkin design in black vinyl and affixed it to the transparent overlay provided with the Yudu. After preparing the emulsion, I exposed the image onto the screen. The Yudu is soooo easy to use; I am so glad that I took the plunge and added it to my Provo Craft line up!
I used gold paint on the pumpkins, but it looks a bit greenish in the photos. I had planned to fill in the the pumpkins in an orange, but as I stated above it just did not look good. I am excited to use my napkins, but I need to heat set the paint first.
Labels:
C-Thanksgiving,
YUDU
Subscribe to:
Posts (Atom)