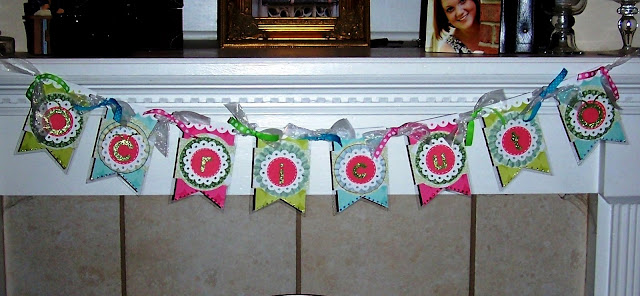
Just as when I am playing a sport, I often need a warm up with a big project. I know that sounds crazy, but I find that I do better on the second project if I "warm up" and get the creative mojo flowing. The Cricut Banner Contest was no exception. This is my warm up contest entry.
I began with with several sheets of acetate - clear plastic-like material - and using the Cricut Expression set on 4 multi cuts, I cut the bottom layer for my banner sections. Three Cricut cartridges were used to create this banner: Art Philosophy, Cricut Everyday, and George & Basic Shapes.
I used the new Art Philosophy cartridge to create the banner main structure pieces - the acetate base layer, the pennant shaped colored layers, the background shape under the rosettes, the scalloped topper, and the scalloped circles.
George and Basic Shapes contributed two shapes to the banner - the circles in the middle of the scalloped circles and the long rectangles used to create the rosettes. The circles were sized to fit the middle of the scalloped circles and to be just a bit larger than the letters.
To create the rosettes, I looked at my Tim Holtz Sizzix rosette die and decided to create a Cricut version. After all I could not use a Sizzix die on my Provo Craft project! Using Cricut Design Studio, I cut eight rectangles measuring 11.5 inches tall by 1.5 inches wide. I place score marks (created by shrinking the rectangle down to a tiny dash) every 1/4 inch along the length of the rectangle. After cutting the rectangles, I used my score pal and scored across the width of the rectangle on each hash mark. I then folded on the scored lines and glued the ends together.
I assembled the banner in layers beginning with the acetate pennants, followed by the colored pennant, then the light green matting, followed by the rosettes, then the scalloped top piece and finally the scalloped circle, regular circle, and letters.
I added Stickles to the bottom of each pennant section in colors to match the individual cuts and to all of the letters and Cricut heads.
I completed the banner by with coordinating ribbons. I used 1.5 inch white organza ribbon to tie the sections together. I then used green, pink and aqua ribbons tied to the organza ribbon to add additional festive colors.
This banner was a lot of work as warm up projects go. However I think it was worth it. My second banner turned out really well. And while it may not win, it is still very pretty and something that had fun creating.


